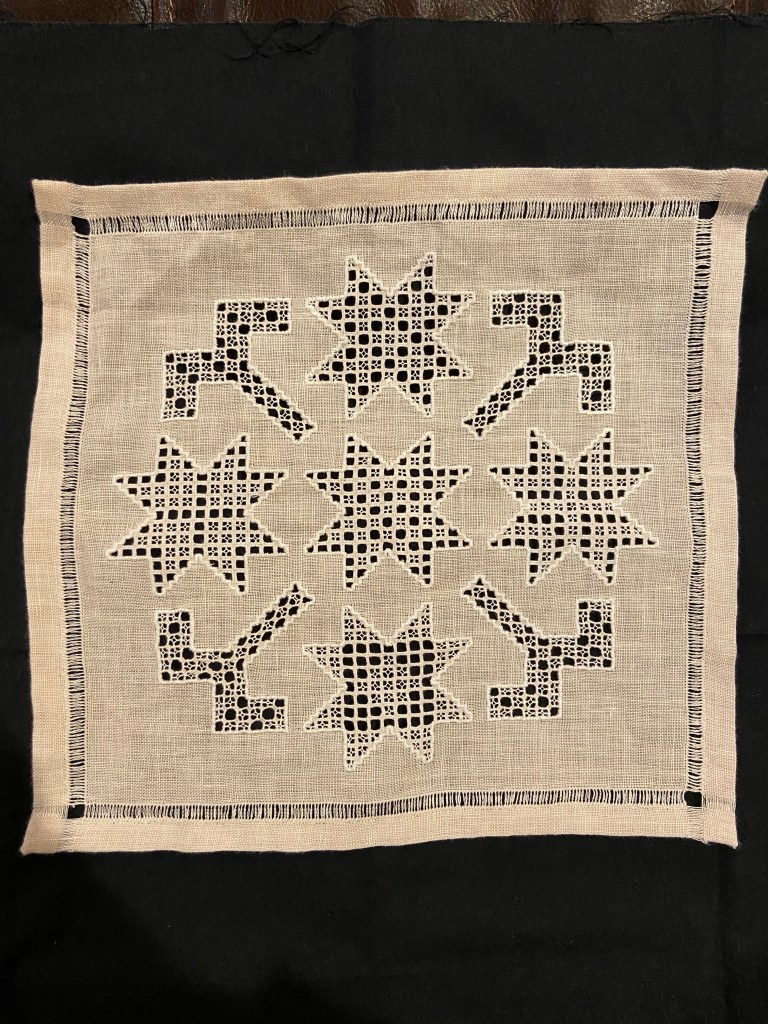
On May 11th, I finished my first Aintab embroidery piece. I worked on this project nearly daily for almost exactly six months, and had spent much longer than that planning and picking up the skills I would need to execute it successfully. To say this has been a long time coming is a massive understatement.

Background
Aintab (or Ayntab) embroidery consists of a combination of cutwork, drawn thread work, satin stitch, and needlelace. It has long been associated with the Ottoman Armenians of Aintab, in part due to the Aintab Cottage Industry started by missionary Fanny Andrews Shepard to provide income to widows and orphans after the Hamidian Massacres in 1895-961, 2, 3. Ms. Shepard was a physician and received her medical degree at the University of Michigan4 before moving to the Ottoman Empire with her husband, Fred D. Shepard.
The elements of Aintab embroidery are not unique to Aintab or Armenians in general. The history of drawn thread embroidery is unclear, with conflicting origin claims in the Middle East and Italy that I will not attempt to untangle here. What I can say with confidence is that by the late 19th century, there were many distinct regional forms of drawn thread and cutwork embroidery. Perhaps the most well known are Hardanger and reticello. Aintab embroidery is distinct in style, not in execution. All cutwork proceeds in the same way:
- The area to be cut is secured, usually by satin or buttonhole stitch.
- The fabric is cut. This can occur along the fabric warp and weft (Aintab, Hardanger, and reticello) or in freeform shapes (also Aintab, Hedebo, broderie anglaise).
- In the former styles: The remaining threads are embroidered into bars. These bars can be needlewoven, wrapped, or buttonholed. Often, Hardanger and reticello bars are needlewoven and Aintab bars are wrapped or buttonholed, but these are not hard rules.
- In all styles: Open areas are filled in using a variety of techniques.
In some Armenian embroidery books2, 3, the various drawn thread and cutwork elements in Aintab embroidery are referred to as “Aintab stitches.” In my own experience, I have not yet come across an element in Aintab embroidery that I have not also seen elsewhere. There are multiple reasons for this, namely that very little in embroidery is truly new or unique. Most styles are merely variations of existing techniques. In the case of Aintab embroidery, a confounding factor is that Ms. Shepard intentionally taught those participating in the Aintab Cottage Industry European-style patterns and techniques so that their pieces would sell better to the Western market2. The primary Europeanized aspects of Aintab embroidery are the use of filet embroidery and the introduction of figural motifs such as angels, butterflies, and fruit.
I think this begs the question that comes up often in Armenian culture – is something still Armenian when it has been influenced by an external culture? Descriptivists (myself included) say yes – Western Armenian folk music is Armenian because Armenians were making it (even if Ottoman Turkish folk music was stylistically similar); shish kebab, dolma, and sarma are Armenian because we eat them (even though they are shared with Turkish cuisine); and Turkish loanwords (shish kebab, dolma, and sarma strike again!) are valid Armenian words because Armenians use them. Generally speaking, I am opposed to the “makoorification5” of Armenian culture but I do think the intentional, artificial introduction of European elements into Aintab embroidery creates a gray area precisely because it was inorganic. I will not say that these elements are not Aintab embroidery, but my interest and focus is on the earlier traditional form.
I set out to learn Aintab embroidery both because I was mesmerized by how beautiful it is and also because I am deeply convicted that I bear responsibility6 as a descendant of Armenian Genocide survivors to keep our culture alive. There is unfortunately very little information available about historical Armenian embroidery techniques and so few practitioners that they are in danger of being lost completely. It is my goal to document what I have learned so far in hopes that this information can be a resource for others who are interested in Armenian embroidery.
The Current State of Aintab Embroidery Resources
There are only a handful books that discuss Aintab embroidery and to the best of my knowledge, they are all out of print.
Armenian Needlelace and Embroidery by Alice Odian Kasparian was my introduction to Aintab embroidery. This book focuses primarily on needlelace with some instruction on Marash embroidery. There are pictures and a brief description7 of Aintab embroidery, but no instruction. Used copies of this book come up fairly often.
Ayntab Needlework by Hrazdan Tokmajian is by far the most comprehensive overview of Aintab embroidery that exists. It covers the history of the Aintab Armenians, the Aintab Cottage Industry, and known embroiderers in great detail. The text is in Armenian and English, though the English translations aren’t great. There is no instruction in this book, but the high quality photographs of numerous textiles more than makes up for this. This book is truly invaluable. I found my copy three years ago and it appears that it has become increasingly difficult to purchase. Copies are very occasionally for sale on eBay.
Armenian Embroidery, Echoes from the Past was published my the Armenian Relief Cross of Lebanon. The text is in both Armenian and English, but the English suffers from the same translation problems as Ayntab Needlework. It has excellent photographs and limited instruction for many types of Armenian embroidery, including Aintab. The Aintab embroidery instruction consists entirely of illustrations (some of which look suspiciously similar to illustrations from the DMC Encyclopedia of Needlework) and are only sufficient for those with prior experience in cutwork and drawn threadwork.
Հայկական Գանձարան (treasury.am) is a digital repository of some Armenian museum pieces, including a large collection of needlework. The pictures aren’t high enough resolution to see the stitching in detail, but it’s a great source of inspiration for composing designs. Here is one of my favorite pieces.
Alternative Resources
I will reiterate that it is the style of Aintab embroidery that is unique, not the underlying techniques. The fundamental skills needed for Aintab embroidery are satin stitch, cutting threads, embroidering bars, filling stitches, drawn thread hemming, and Armenian needlelace. Resources for learning these skills are widely available, and many of them are free.
The Antique Pattern Library is a digital repository of public domain craft publications. They have an extensive collection of embroidery, lace, and other craft information, including a large number of DMC and Priscilla books that are available for free download. Standouts that I highly recommend include:
- Priscilla Armenian Lace Book: This book is what got me started with Armenian lace. I use a slightly different technique now but this is largely preference. It has instructions for working on fabric edges, making doilies, and quite a few patterns.
- DMC Drawn Thread Work, Parts 1 and 2: Instruction for hemstitching and quite a few drawn thread borders.
- DMC Hardanger Embroideries: Instruction for cutting threads, preparing bars (overcast and needlewoven), and several filling stitches. Note the stylistic differences between Hardanger motifs and Aintab motifs.
The DMC Encyclopedia of Needlework is available from Project Gutenberg and has instructions for a variety of needlework techniques, including counted embroidery, drawn thread work, and cutwork. The standalone Hardanger and drawn thread publications are more in depth, but the content in the Encyclopedia is more than sufficient for getting started.
The public domain books are free because their copyright has expired or been forfeited, meaning that most of them are quite old. The DMC Encyclopedia of Needlework was first published in 1886 and the Priscilla Armenian Lace Book was published in 1923. The instructional style of these publication is quite different from modern craft publications and they tend to be quite wordy with comparatively few pictures or illustrations.
I have some modern book recommendations as well. These unfortunately aren’t free, but are valuable learning resources.
- Hardanger Filling Stitches by Yvette Stanton: This is an excellent book that was only published in late 2023. I didn’t preorder it early enough and didn’t receive my copy until I had already finished all of my cutwork, but it would have saved me a lot of experimentation and troubleshooting had I been able to reference it sooner. Yvette includes instructions for satin stitch motif outlines (though there are stylistic differences in how this looks for Hardanger vs. Aintab embroidery), how to cut threads, methods for covering bars, and a great variety of filling stitches. Each step is illustrated for left- and right- handers, and there are pictures of the competed stitches. This book is invaluable if you enjoy cutwork or are a beginner who wants to learn.
- Punti a Giorno by Giuliana Buonpadre: An entire book dedicated to hemstitching and decorative drawn thread borders that also includes instructions for handling corners. I have the French/English edition but the original was in Italian. While most of Giuliana’s books assume some proficiency in embroidery, this is one of the more beginner-friendly titles. The illustrations and pictures are excellent.
- Հայկական Ասեղնագործ Ժանեակ (Armenian Needlework Embroidery) by Lusine Mkhitaryan: This is the best book about Armenian lace that is currently in print. It covers fabric edgings and doilies in the technique that I use (Van style) as well as flowers (and a chicken!) in the Garin/Erzurum style. The text is in Eastern Armenian (which I struggle to read) but there are numerous photos so it is absolutely not necessary to read Armenian to learn from this book. It is available from Abril Books and the Online Armenian Store.
Design Process
As you can imagine, there aren’t Aintab embroidery patterns for sale in any of the places where other embroidery patterns are sold. I instead designed my own chart, taking inspiration from pieces I’ve seen in books and online.
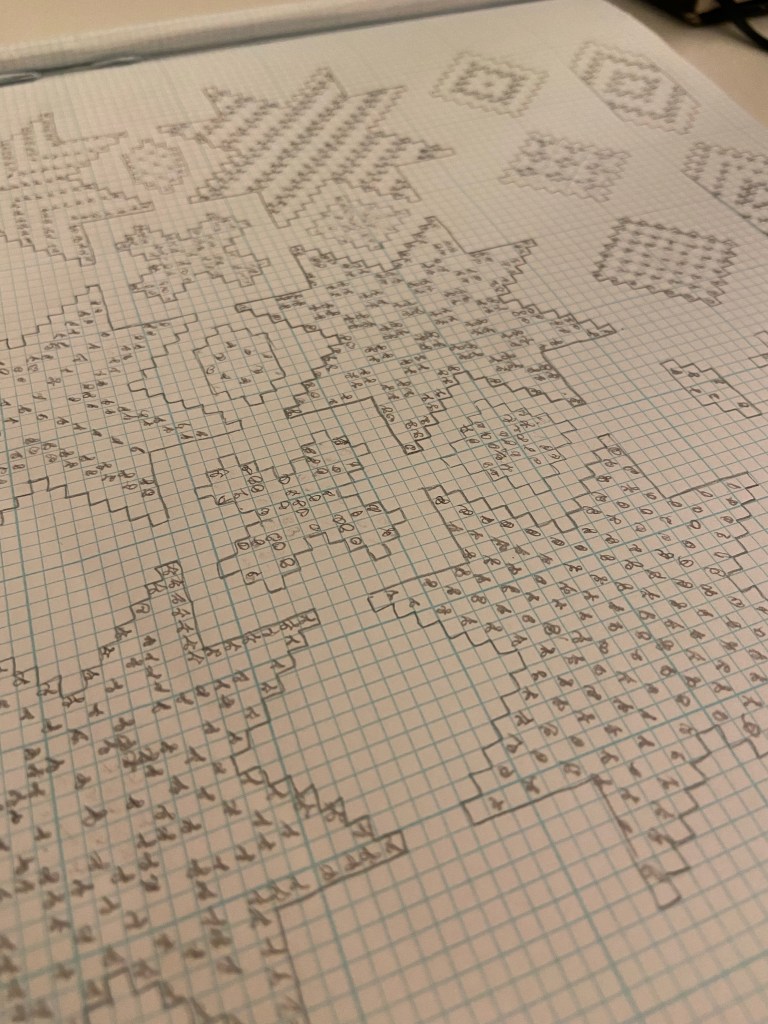
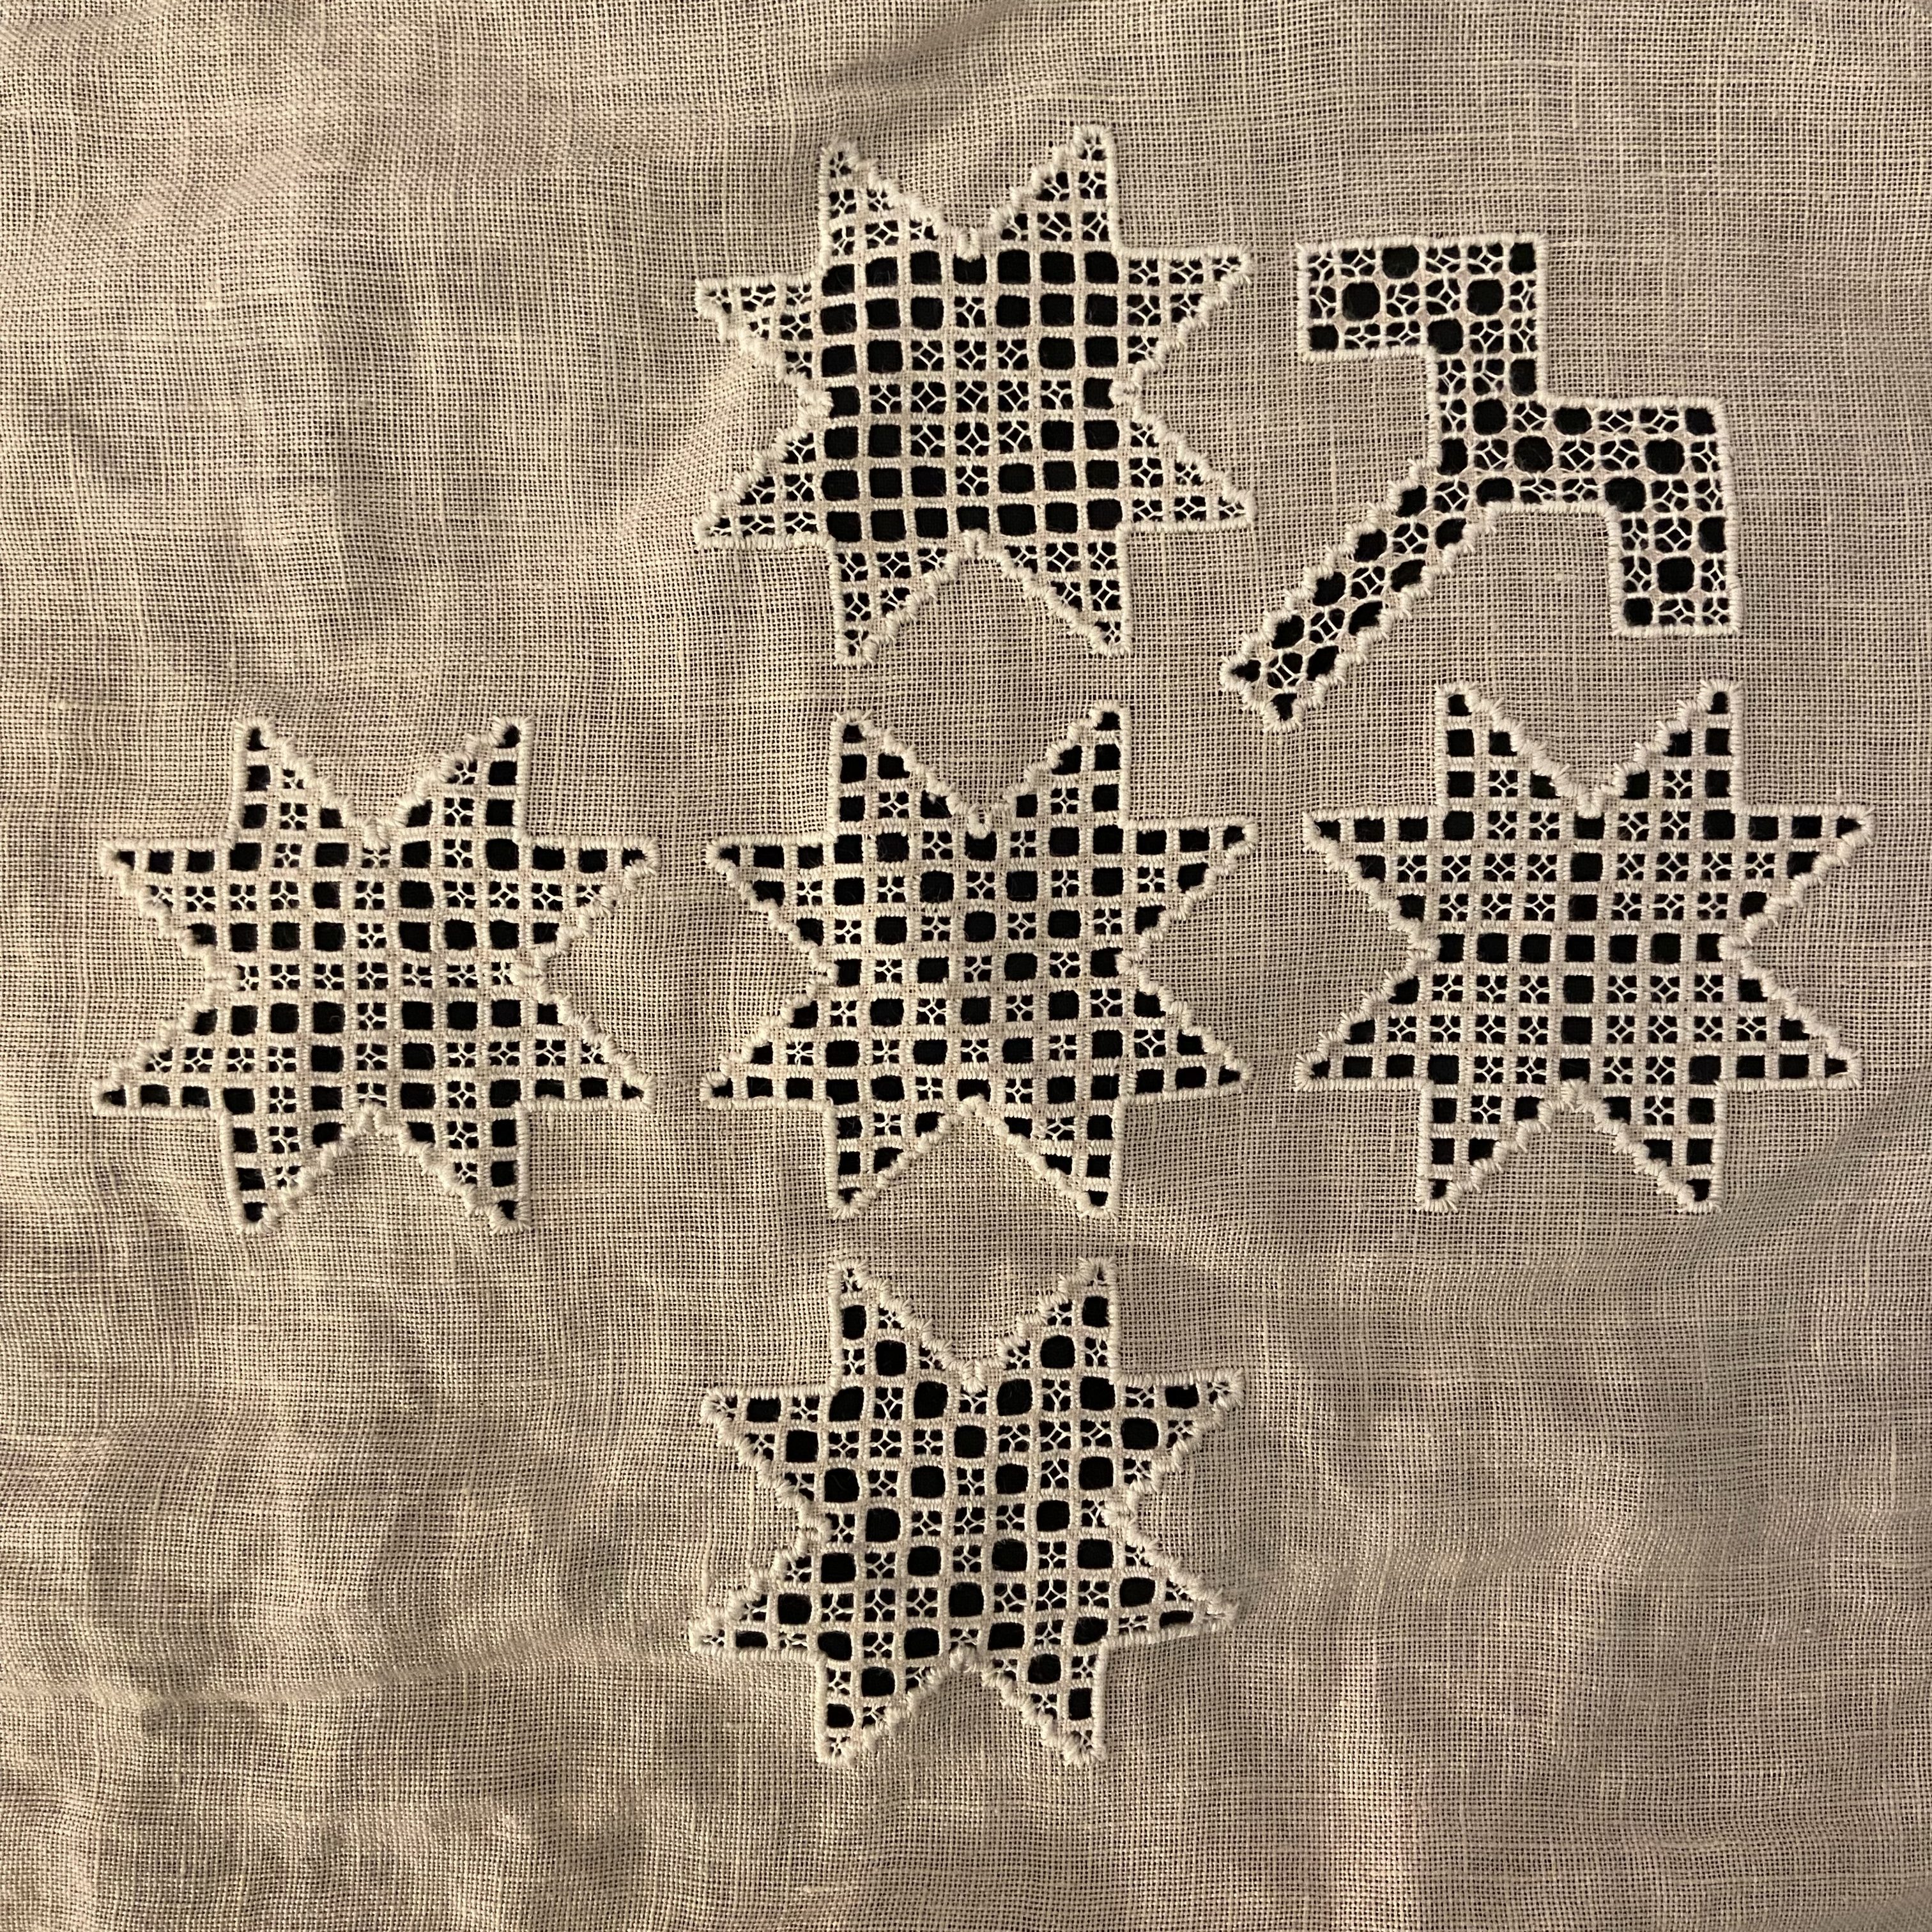
My first sketch is below. I was playing with motifs I had seen on historical textiles and really liked the stars, so I chose those as the focus for my first piece.
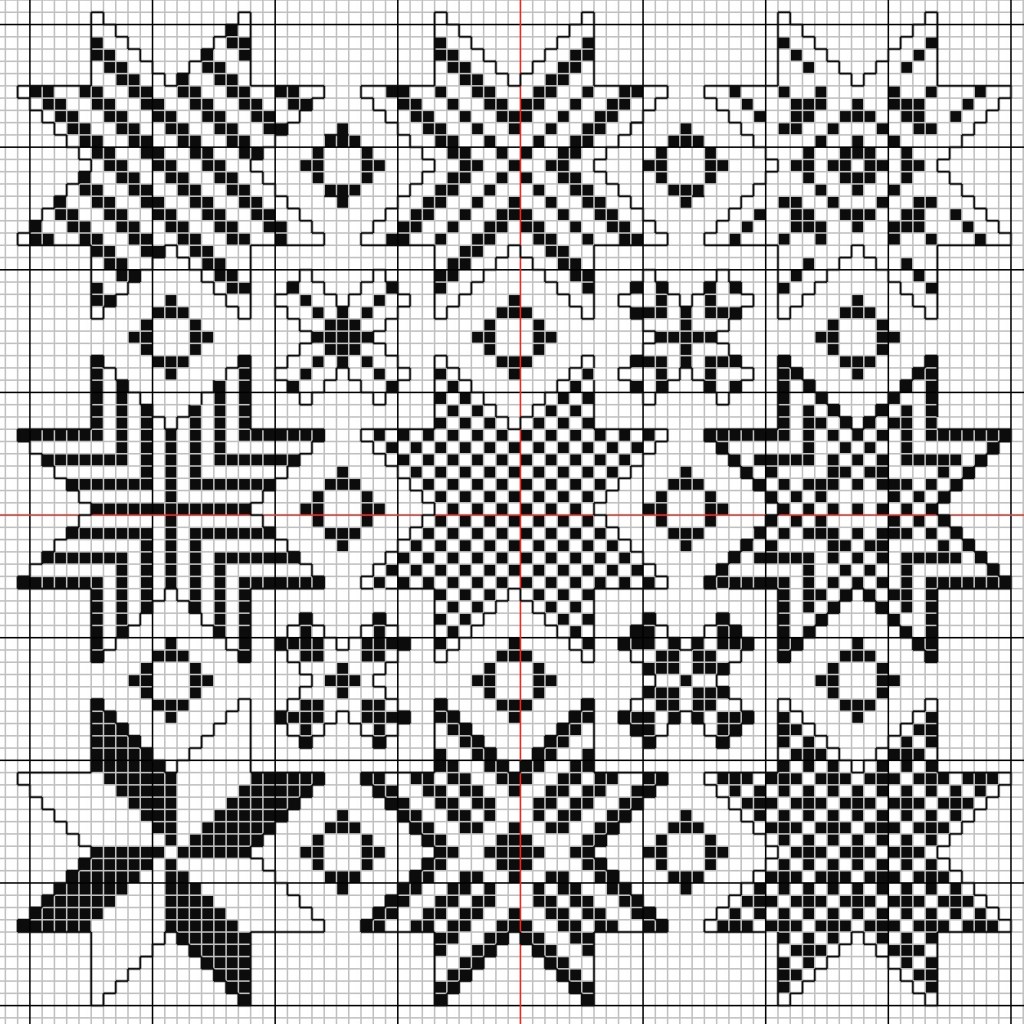
I next digitally charted a design using the stars as my primary motif. I forgot something critical here: in the star motifs, black spaces represent filling stitches whereas in the diamonds between the stars, the black spaces represent satin stitches. In a completed embroidery piece, the bars that separate each space are functionally gridlines. This does not mean they can be represented by gridlines in the chart. Luckily I caught this very early on as I started embroidering.
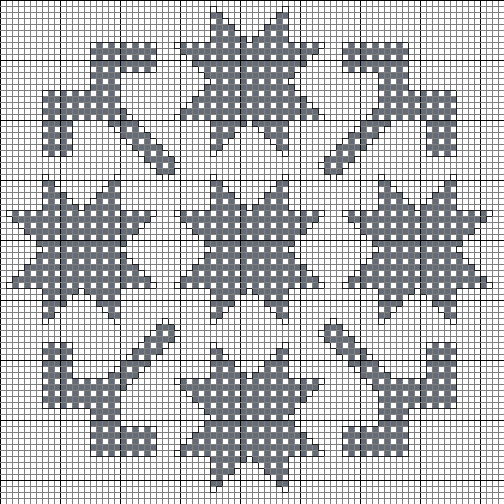
This chart is also extremely dense. Each graph square represents four threads, meaning the stars are only 12 threads apart. I realized quite quickly that having additional cutwork between the stars would severely weaken the fabric, so I removed those from my design. After looking through my books again, I decided I also really like the hook motif and replaced the corner stars with hooks. Below is the revised chart after I made these changes. In this chart, white spaces inside each motif outline represent cut threads and the gray spaces are the remaining threads.
I then added sketched in black spaces where I wanted filling stitches to go, choosing a different pattern for each star and working off of this chart as I embroidered.
Doing the Embroidery
This is the part you’ve been waiting for (and the part I’ve been waiting for after spending three days writing everything you’ve read so far).
Materials
Aintab embroidery is done on counted fabric with equal warp and weft counts. Counted linen and cotton is available from cross stitch suppliers. Although some craft stores stock counted fabric, it is lower quality than that found in specialty cross stitch stores. In practice, the lower quality corresponds to uneven warp and weft counts, which leads to distortion in the finished embroidery as the grid is rectangular rather than square.
Counted fabric is categorized by thread count, or the number of warp and weft threads per inch. Higher numbers correspond to a denser weave. I used 40 count linen for my Aintab project. This is considered a relatively high count today – cross stitch is often done on 28 to 36 count and Hardanger fabric is 22 count. The transition to lower thread counts is relatively modern. These looser weaves are much easier to see but not historically accurate. I would recommend an embroidery beginner to start with no finer than 32 count fabric rather than jumping straight to 40 or beyond. Zweigart and Wichelt linens are high quality, come in many colors and counts, and are sold at most cross stitching and specialty embroidery retailers.
Thread choice will be somewhat dependent on fabric count. For this project, I used no. 100 DMC cordonnet special for all of the embroidery elements and the lace. For lower thread counts, perle cotton is often recommended in Hardanger resources. Many of these authors suggest using two sizes of thread – a heavier weight for the satin stitch and lighter for the bars and filling stitches. Coton a broder sits in the gap between perle cotton and cordonnet – it has a higher twist and comes in lighter weights than perle cotton but is not as fine as the finest cordonnet. Unlike cordonnet, it is 5-ply rather than 6-ply.
I did consider using coton a broder for this project, but I wanted to use white thread and only had ecru and some blues on hand. From my previous experiences testing it, I think I would have worked very nicely in this piece. My satin stitching with the cordonnet is sparse in some areas and the coton a broder would have filled this in a little better.
DMC cordonnet special and other 6-ply threads are available from Handy Hands. Perle cotton is available at most craft stores as well as Handy Hands. The DMC coton a broder is harder to find in the United States. I purchase mine from Sarah Classic Sewing, who sells individual skeins as well as color bundles.
An important consideration before starting a cutwork project is scissors. In order to cut accurately, the blades must be thin and very sharp with fine points. I did buy some (very cheap) Hardanger scissors, but I think they were designed for use on 22 count Hardanger fabric, and weren’t precise enough to use on my 40 count linen. I ended up using a pair of Gingher Featherweight thread snips for all of the cutting. The design of the blades was perfect, but they aren’t meant for cutwork and aren’t very ergonomic for repeated cutting. I’m still looking for a pair of dedicated cutwork scissors.
I did all of my embroidery in a hoop. Some prefer to do cutwork in hand and others use a frame. This is largely preference – hoops are most comfortable for me. I switched between using a hoop stand and holding the hoop in one hand. Again, this is preference. I liked to use the hoop stand for satin stitch and for cutting so I could work with both hands, and did most of the filling stitches off of the stand so I could rotate my work as I switched directions.
Getting Started
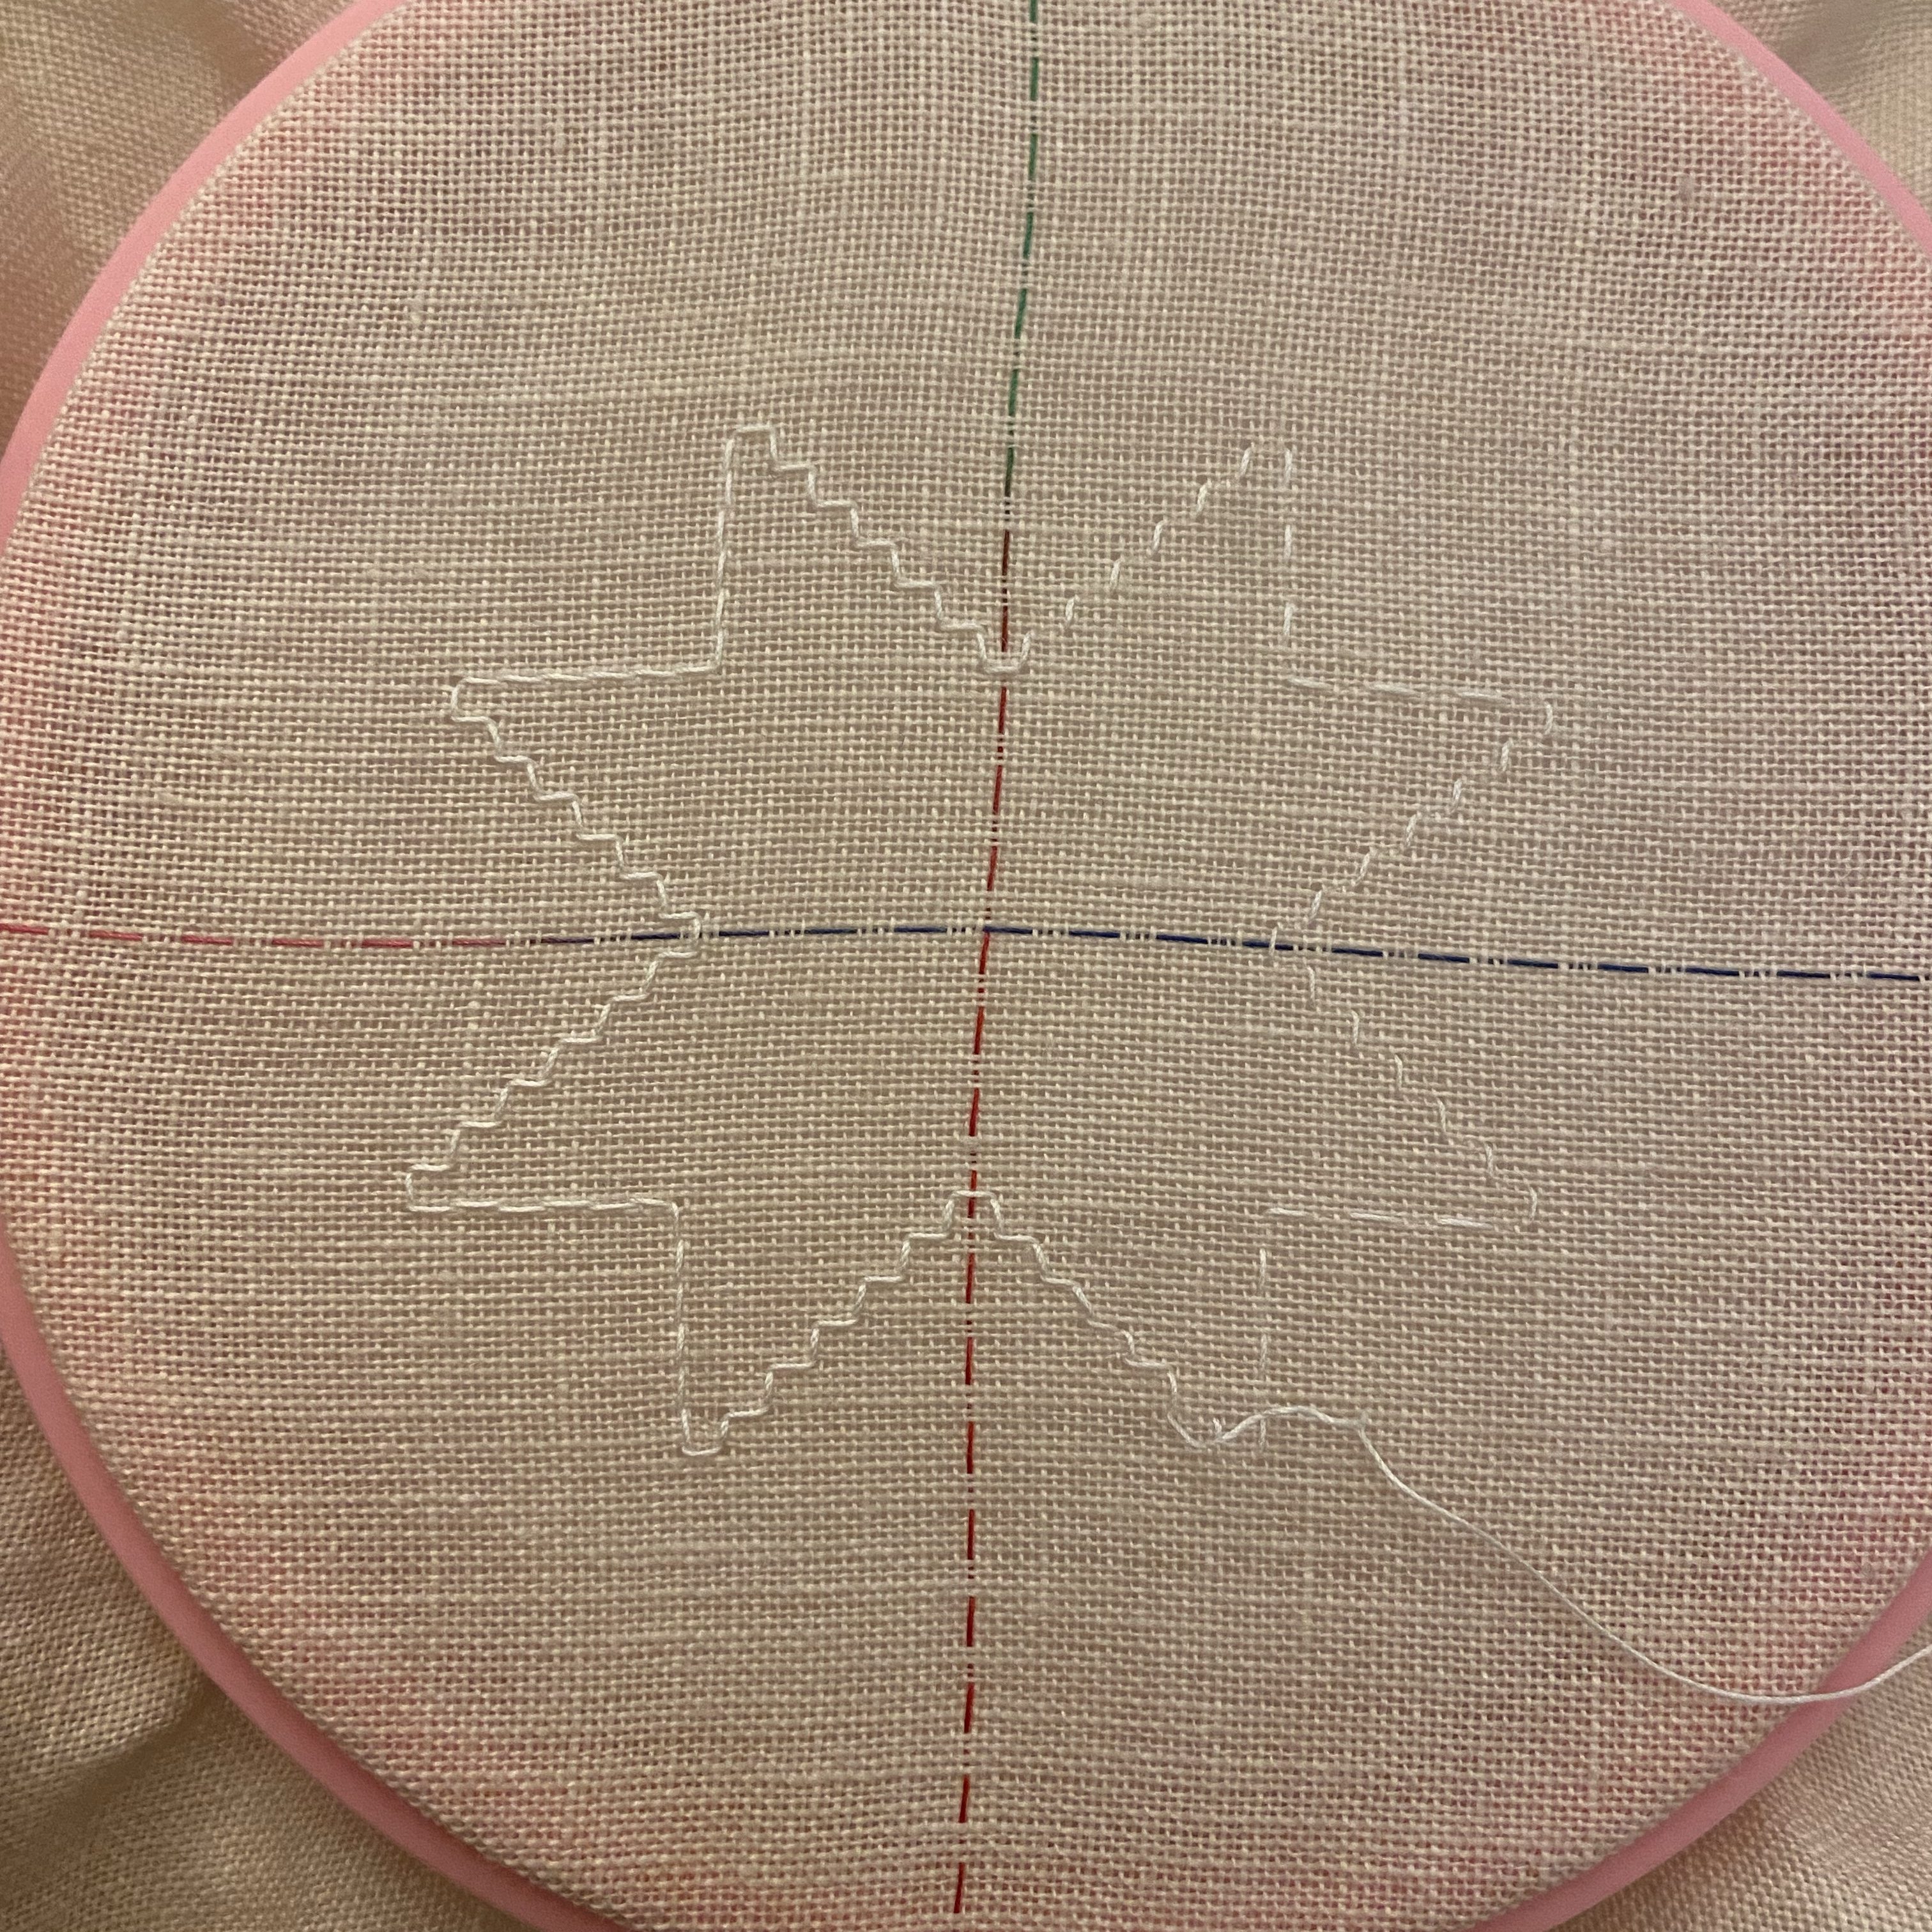
I always start in the center of my fabric because I like to have the margins be as equal as possible. For this piece, I folded the fabric twice to get an approximate center mark, then used sewing thread to baste my center lines using a 4×4 running stitch. This step is optional and serves as a sanity check for counting threads on the first motif.
I use a double running stitch to outline each motif. This acts as padding for the upcoming satin stitch and also serves as a guide to avoid constantly counting threads and referencing the chart as you embroider. I did my double running stitch over four threads to match my cutting plan.
In some forms of cutwork, including reticello, several layers of outline threads are used to create a thicker padding around the motif. I elected not to do that here due to the number of corners in each motif.
Satin Stitching
Satin stitching is essential to lock the ground fabric into place before beginning to cut. I made my satin stitches over two threads, always stitching from inside to outside of the motifs and making sure I encased the double running stitches with my thread.
If you are familiar with Hardanger embroidery, you may be aware that Kloster blocks and other satin stitch blocks never have diagonal lines. The vast majority of Aintab embroidery pieces I’ve seen do use diagonal satin stitches, so I used them here. This is one of the stylistic variations that separates different forms of cutwork. Reticello is another style that tends to use diagonal satin stitching.
Cutting the Threads
Cutting technique is just as important as scissors for neat cutwork. My preferred method is to begin cutting a thread away from the motif edge. I use a needle to lift the thread slightly above the fabric to avoid accidentally clipping the wrong thread. I then draw that thread outwards towards the satin stitch border, then cut as close to the satin stitching as possible while keeping the thread under light vertical tension.
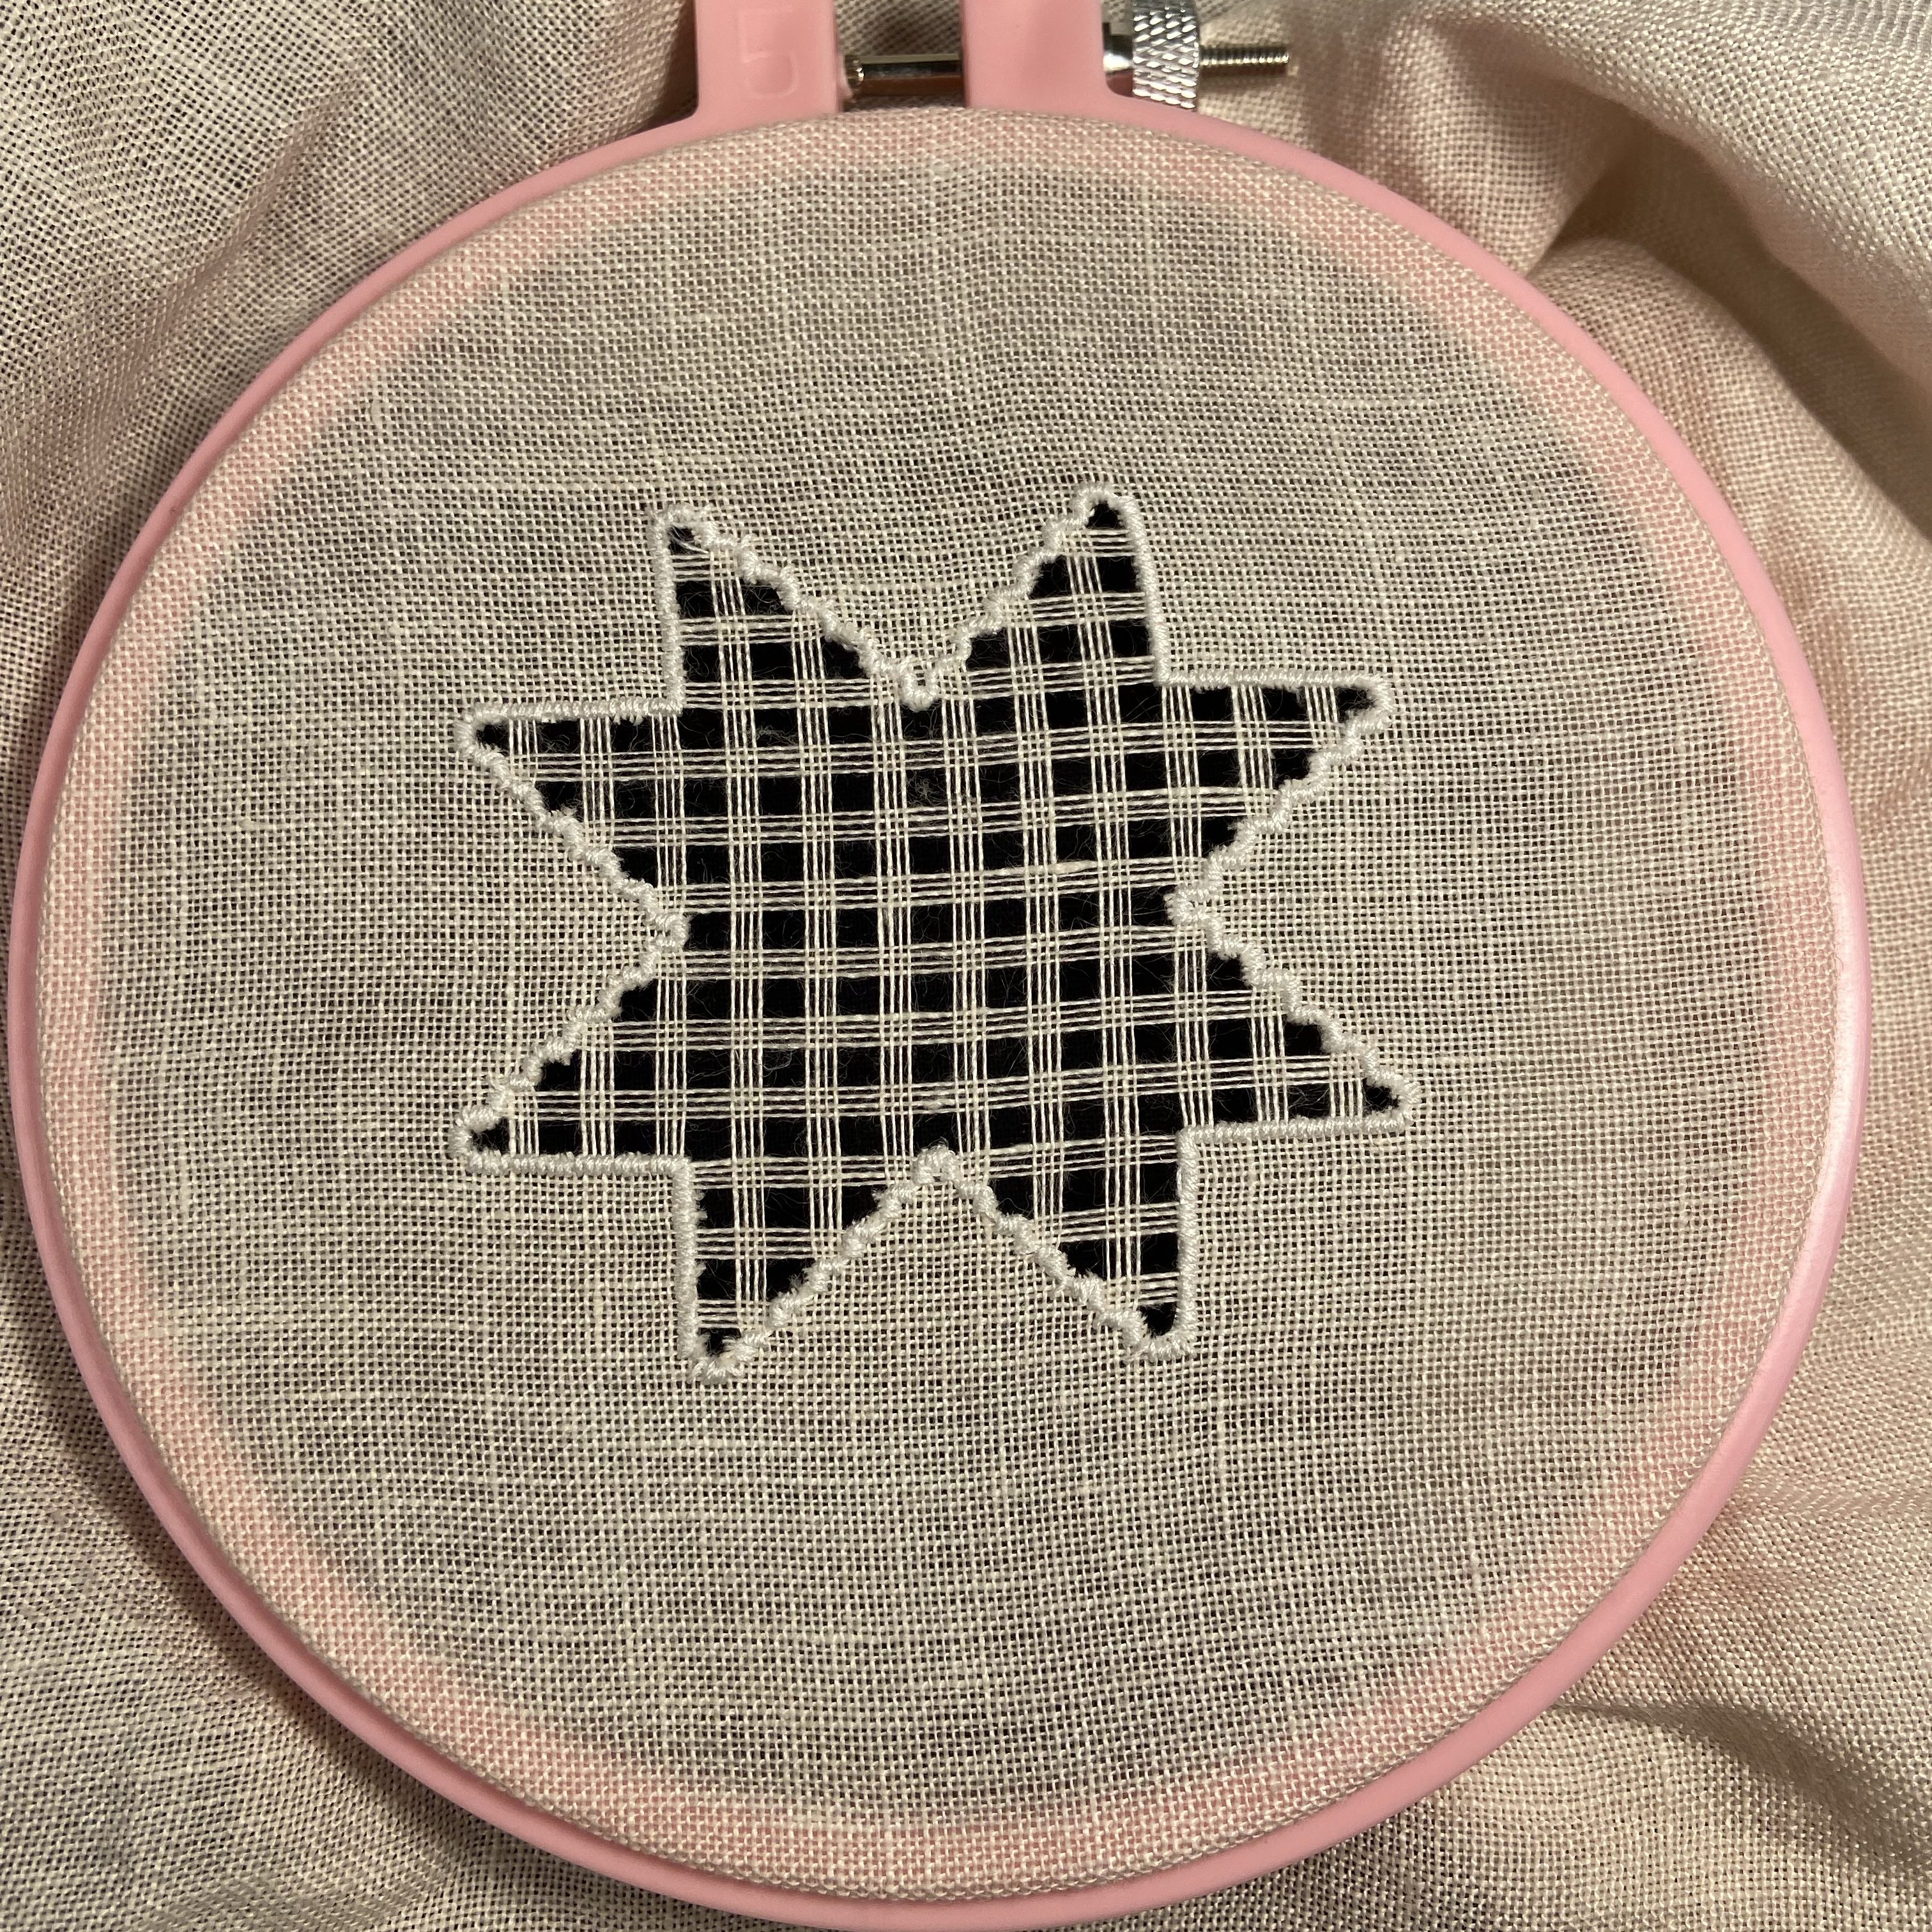
Ideally, there are no linen “teeth” showing after the threads are cut. It takes quite a bit of practice to be able to cut cleanly without leaving teeth. While there are some teeth showing in the image above, I did get better at this over time.
Embroidering the Bars and Filling Stitches
Another process that can distinguish different forms of cutwork is the way in which bars and filling stitches are completed. Embroidering bars in vertical and horizontal rows is often considered better because there is less opportunity to distort the ground fabric. I have worked this way and also diagonally in sample projects. I elected to work diagonally for this piece because it’s a little faster and I enjoy it more.
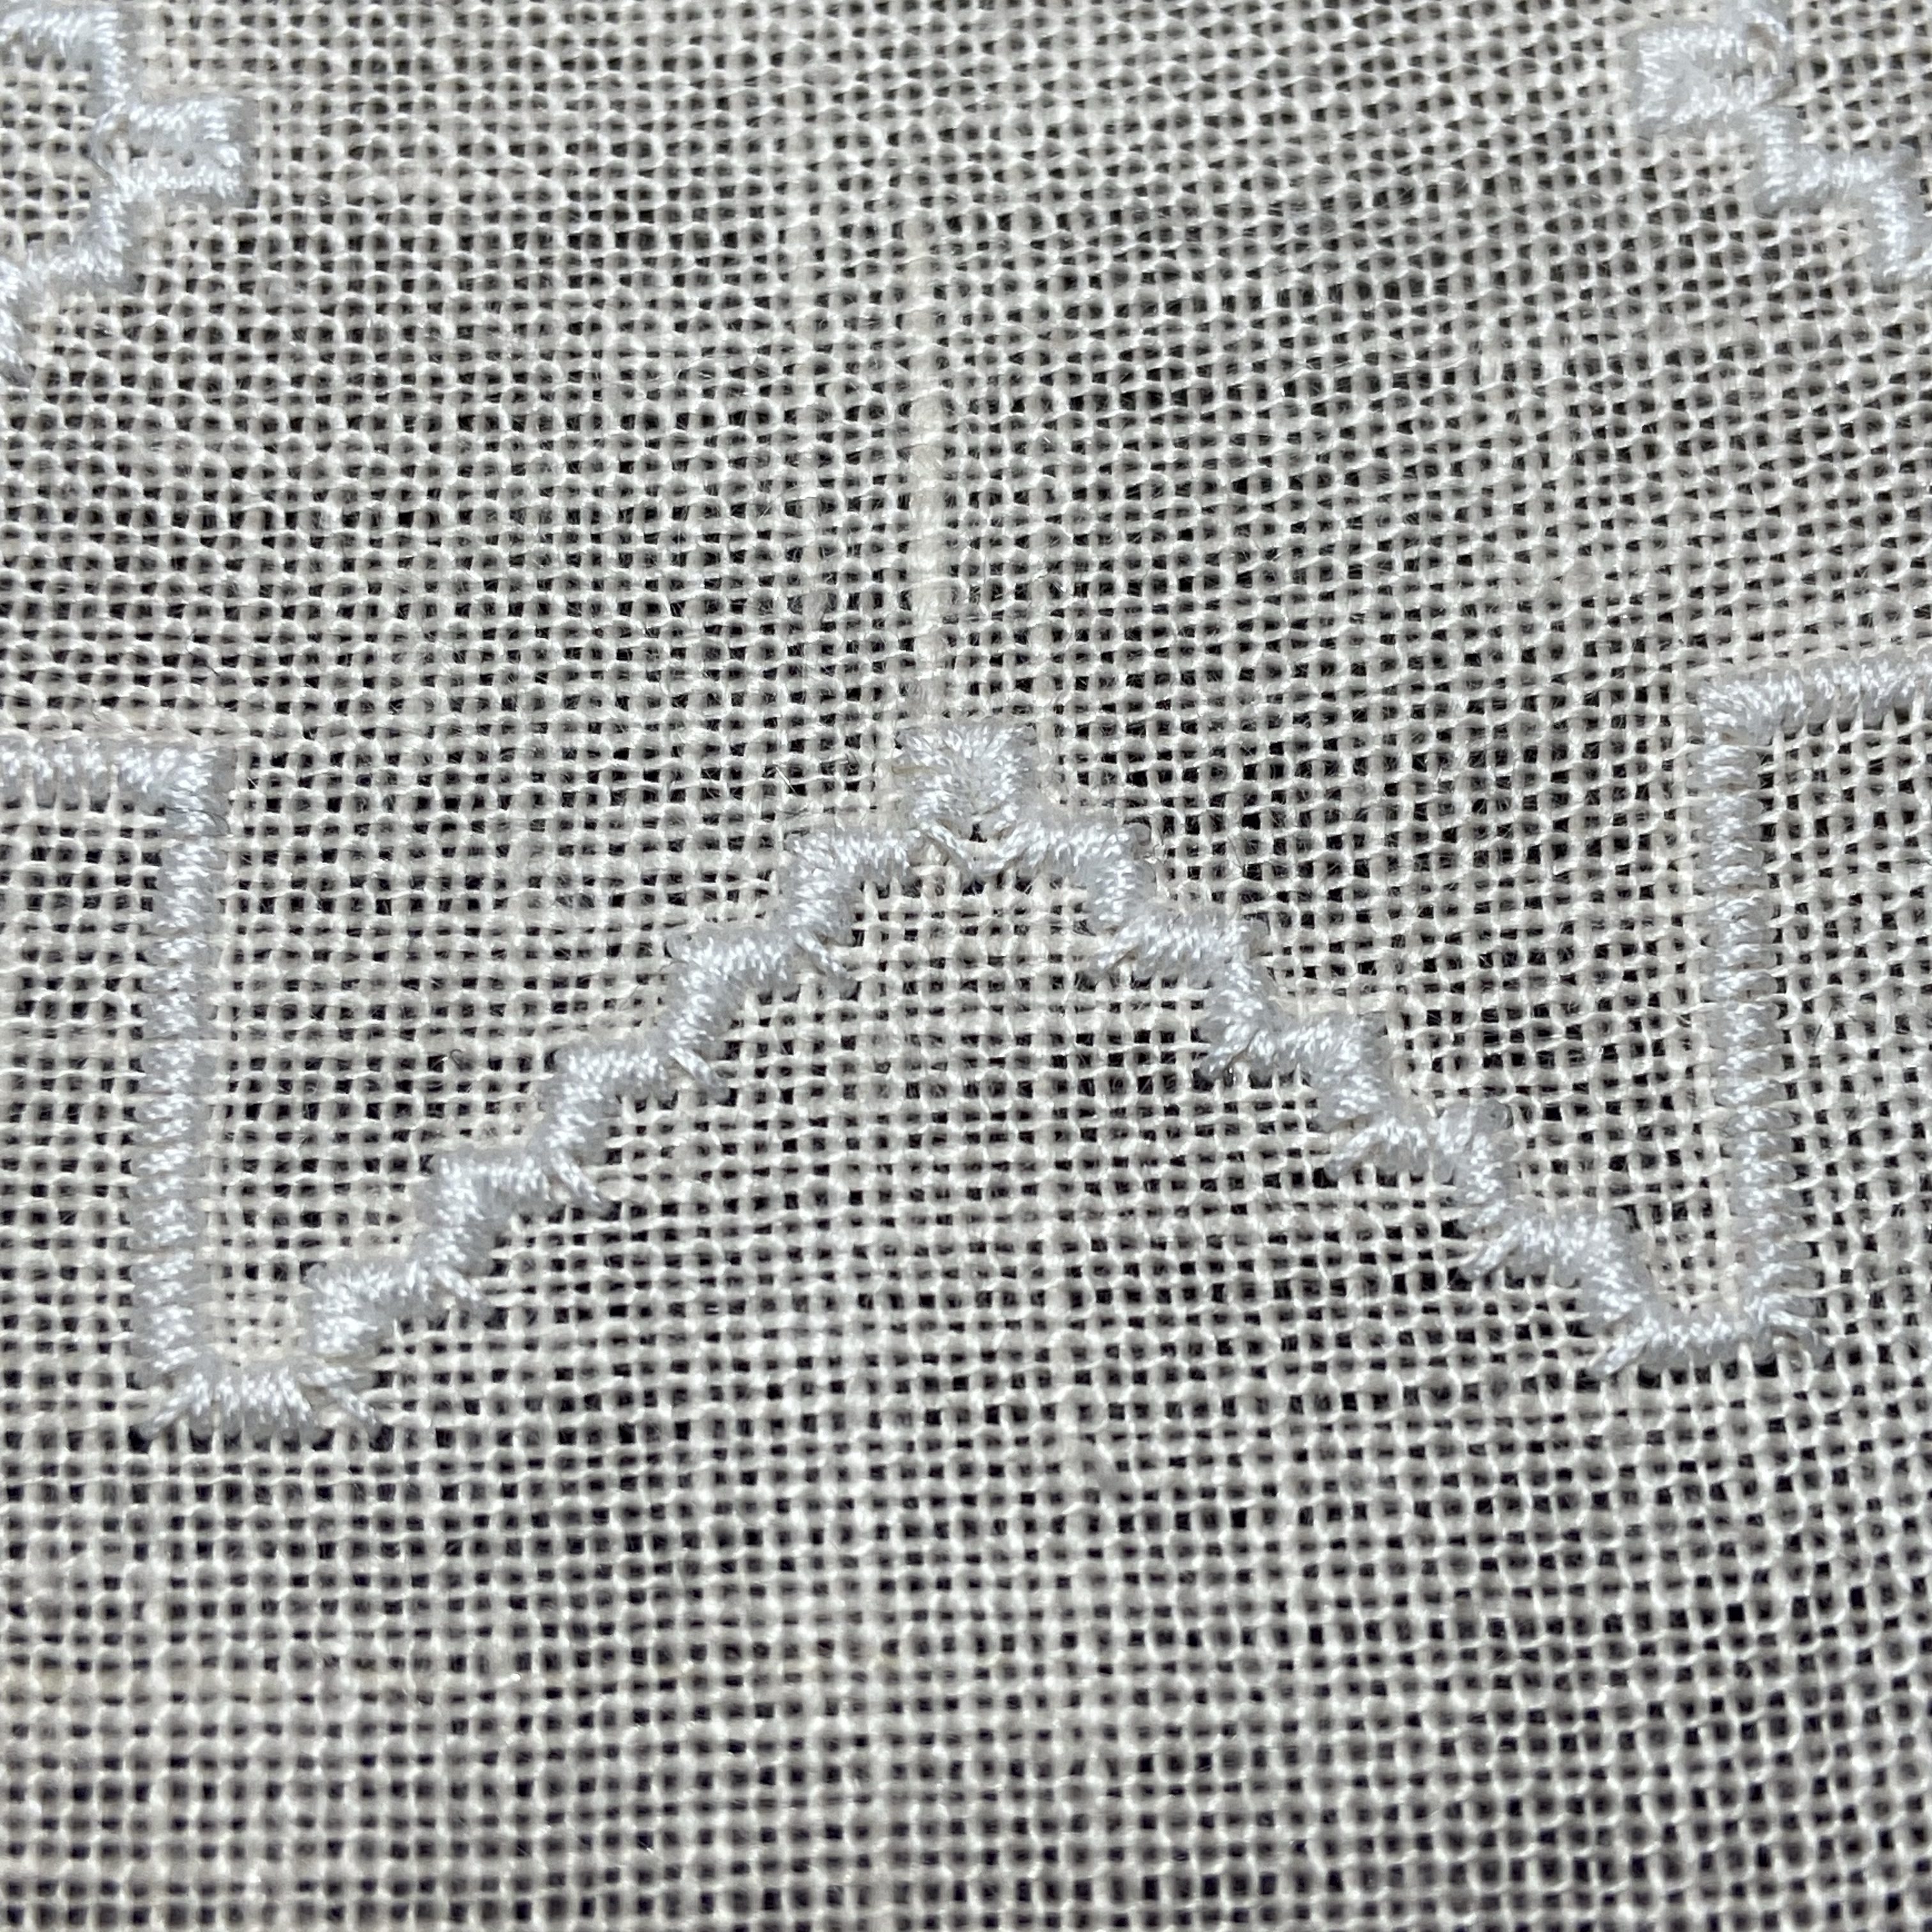
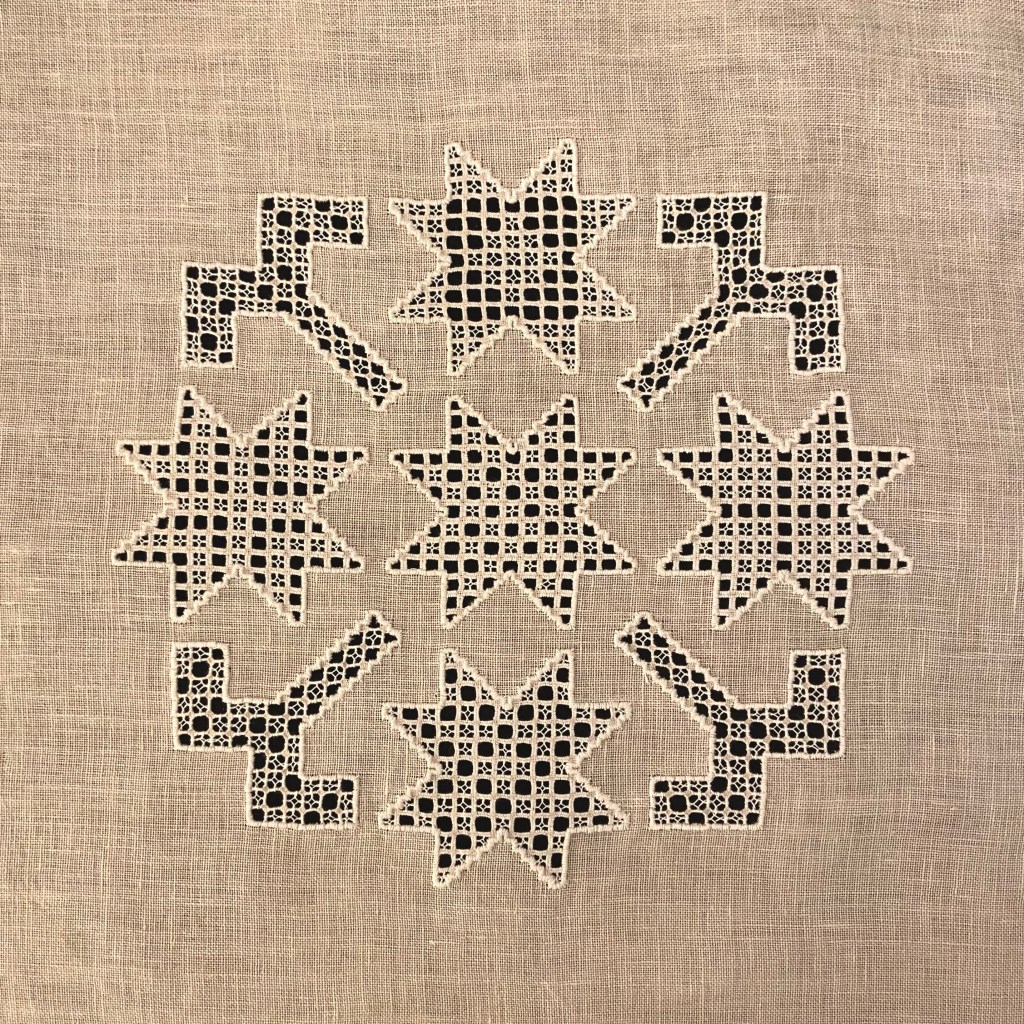
I started in the top left corner of the star and worked down to the bottom right. I needlewove the groups of four threads, always bringing the needle up through center of the bar as I wove.
I added filling stitches according to my chart. Each graph square takes two passes to complete – one down to the right, and a second up to the left. The filling stitches are added while embroidering the fourth side of any given square.
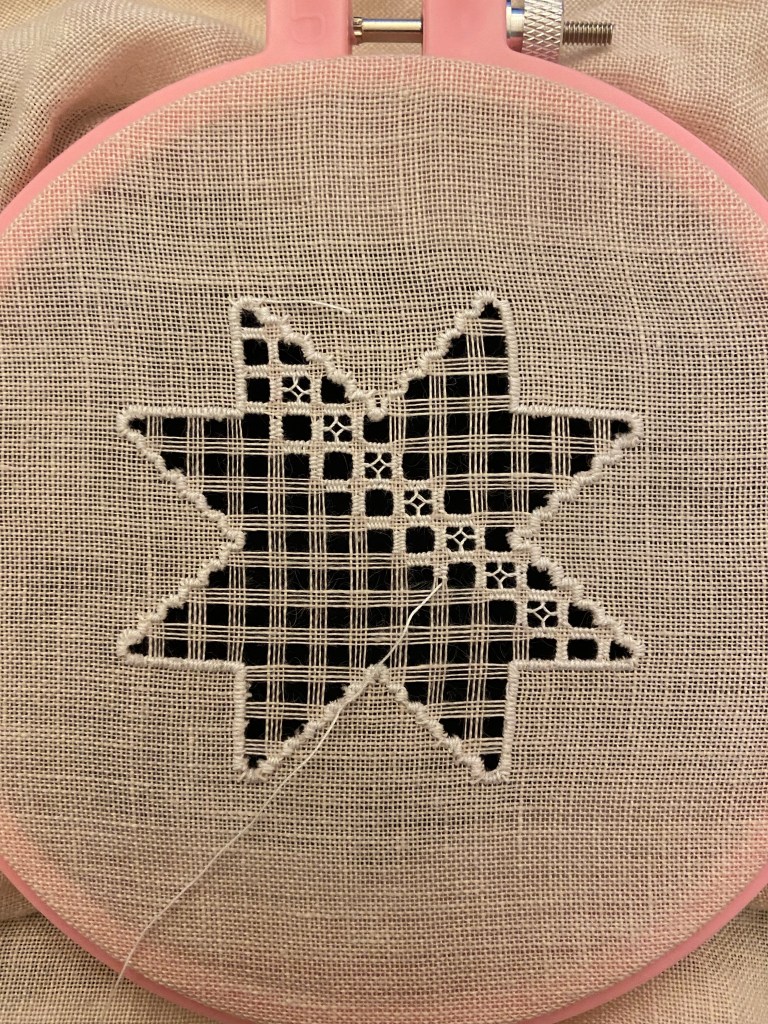
I exclusively used dove’s eyes as the filling stitch on this piece, though there are many different types of filling stitches. It is common to see several filling stitches used on an Aintab embroidery piece.
The Rest of the Owl
I followed the same process above for the rest of my motifs. As I embroidered, I slowly refined my methods for satin stitching concave and convex corners, cutting threads, and executing filling stitches.
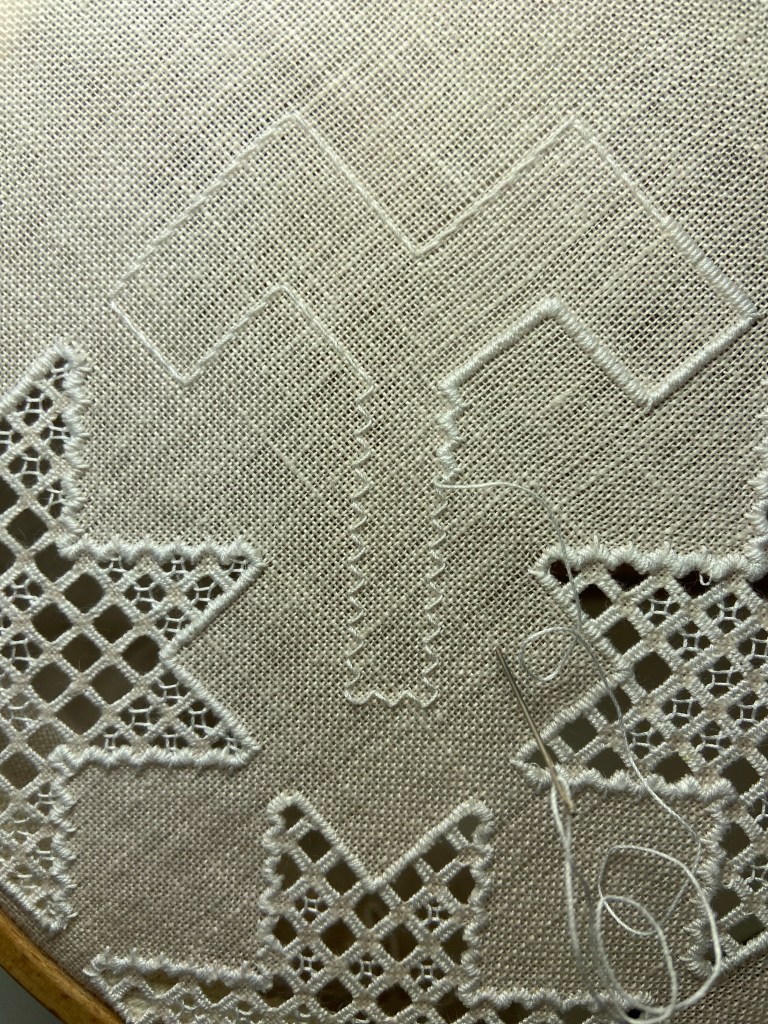
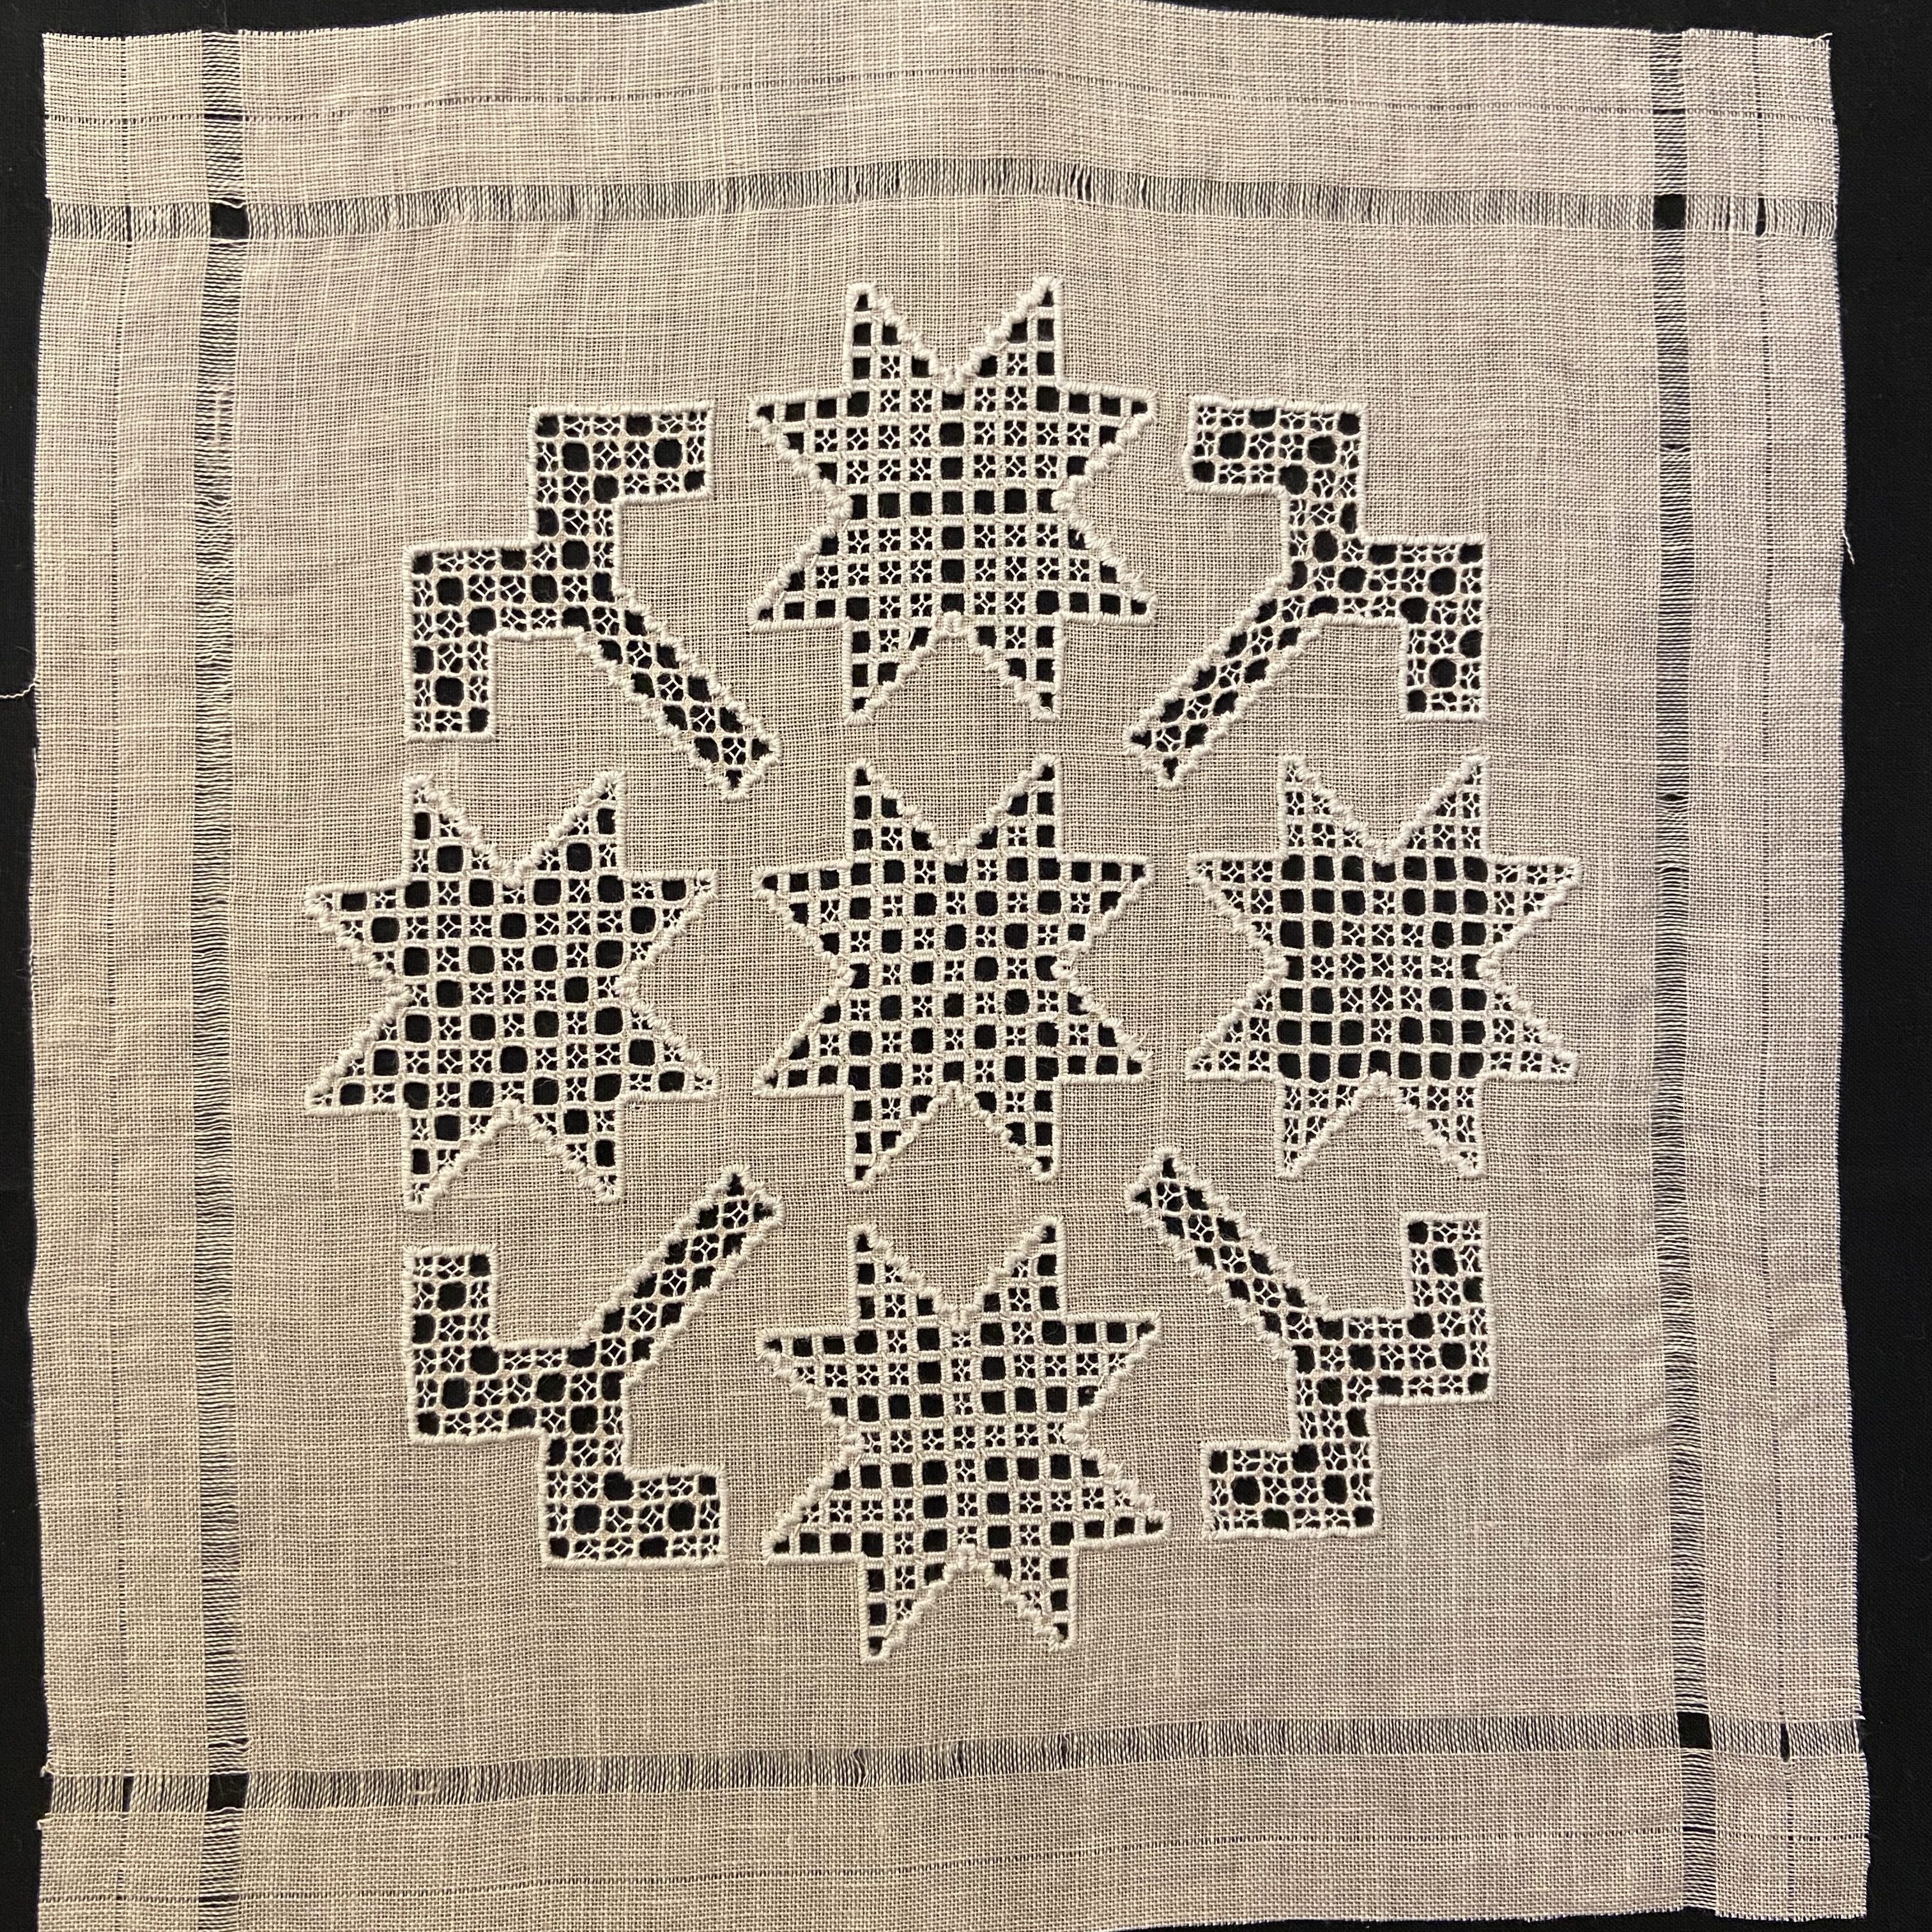
When I compared my work to images of historical Aintab embroidery, I realized most of the pieces used overcast bars rather than needlewoven bars. I switched to overcast bars when I began the hook motifs. I much prefer the way this looks – it’s very light and airy in comparison to the substantial needlewoven bars.
Cutwork is a slow, methodical process. Of the six months I spent working on this project, five were dedicated to cutwork. I embroidered everywhere I could – on planes, in cars when others were driving, at my knitting group (it has been quite awhile since I’ve done any knitting), at my lace group, and truly anywhere else I could get enough light to see what I was doing.
This was my first big cutwork project, and the first cutwork I’ve designed myself. I’m quite happy with the way it turned out and discovered that I really enjoy the process. There were some mishaps along the way that became true learning experiences as I figured out how to salvage my mistakes.
Hemstitching
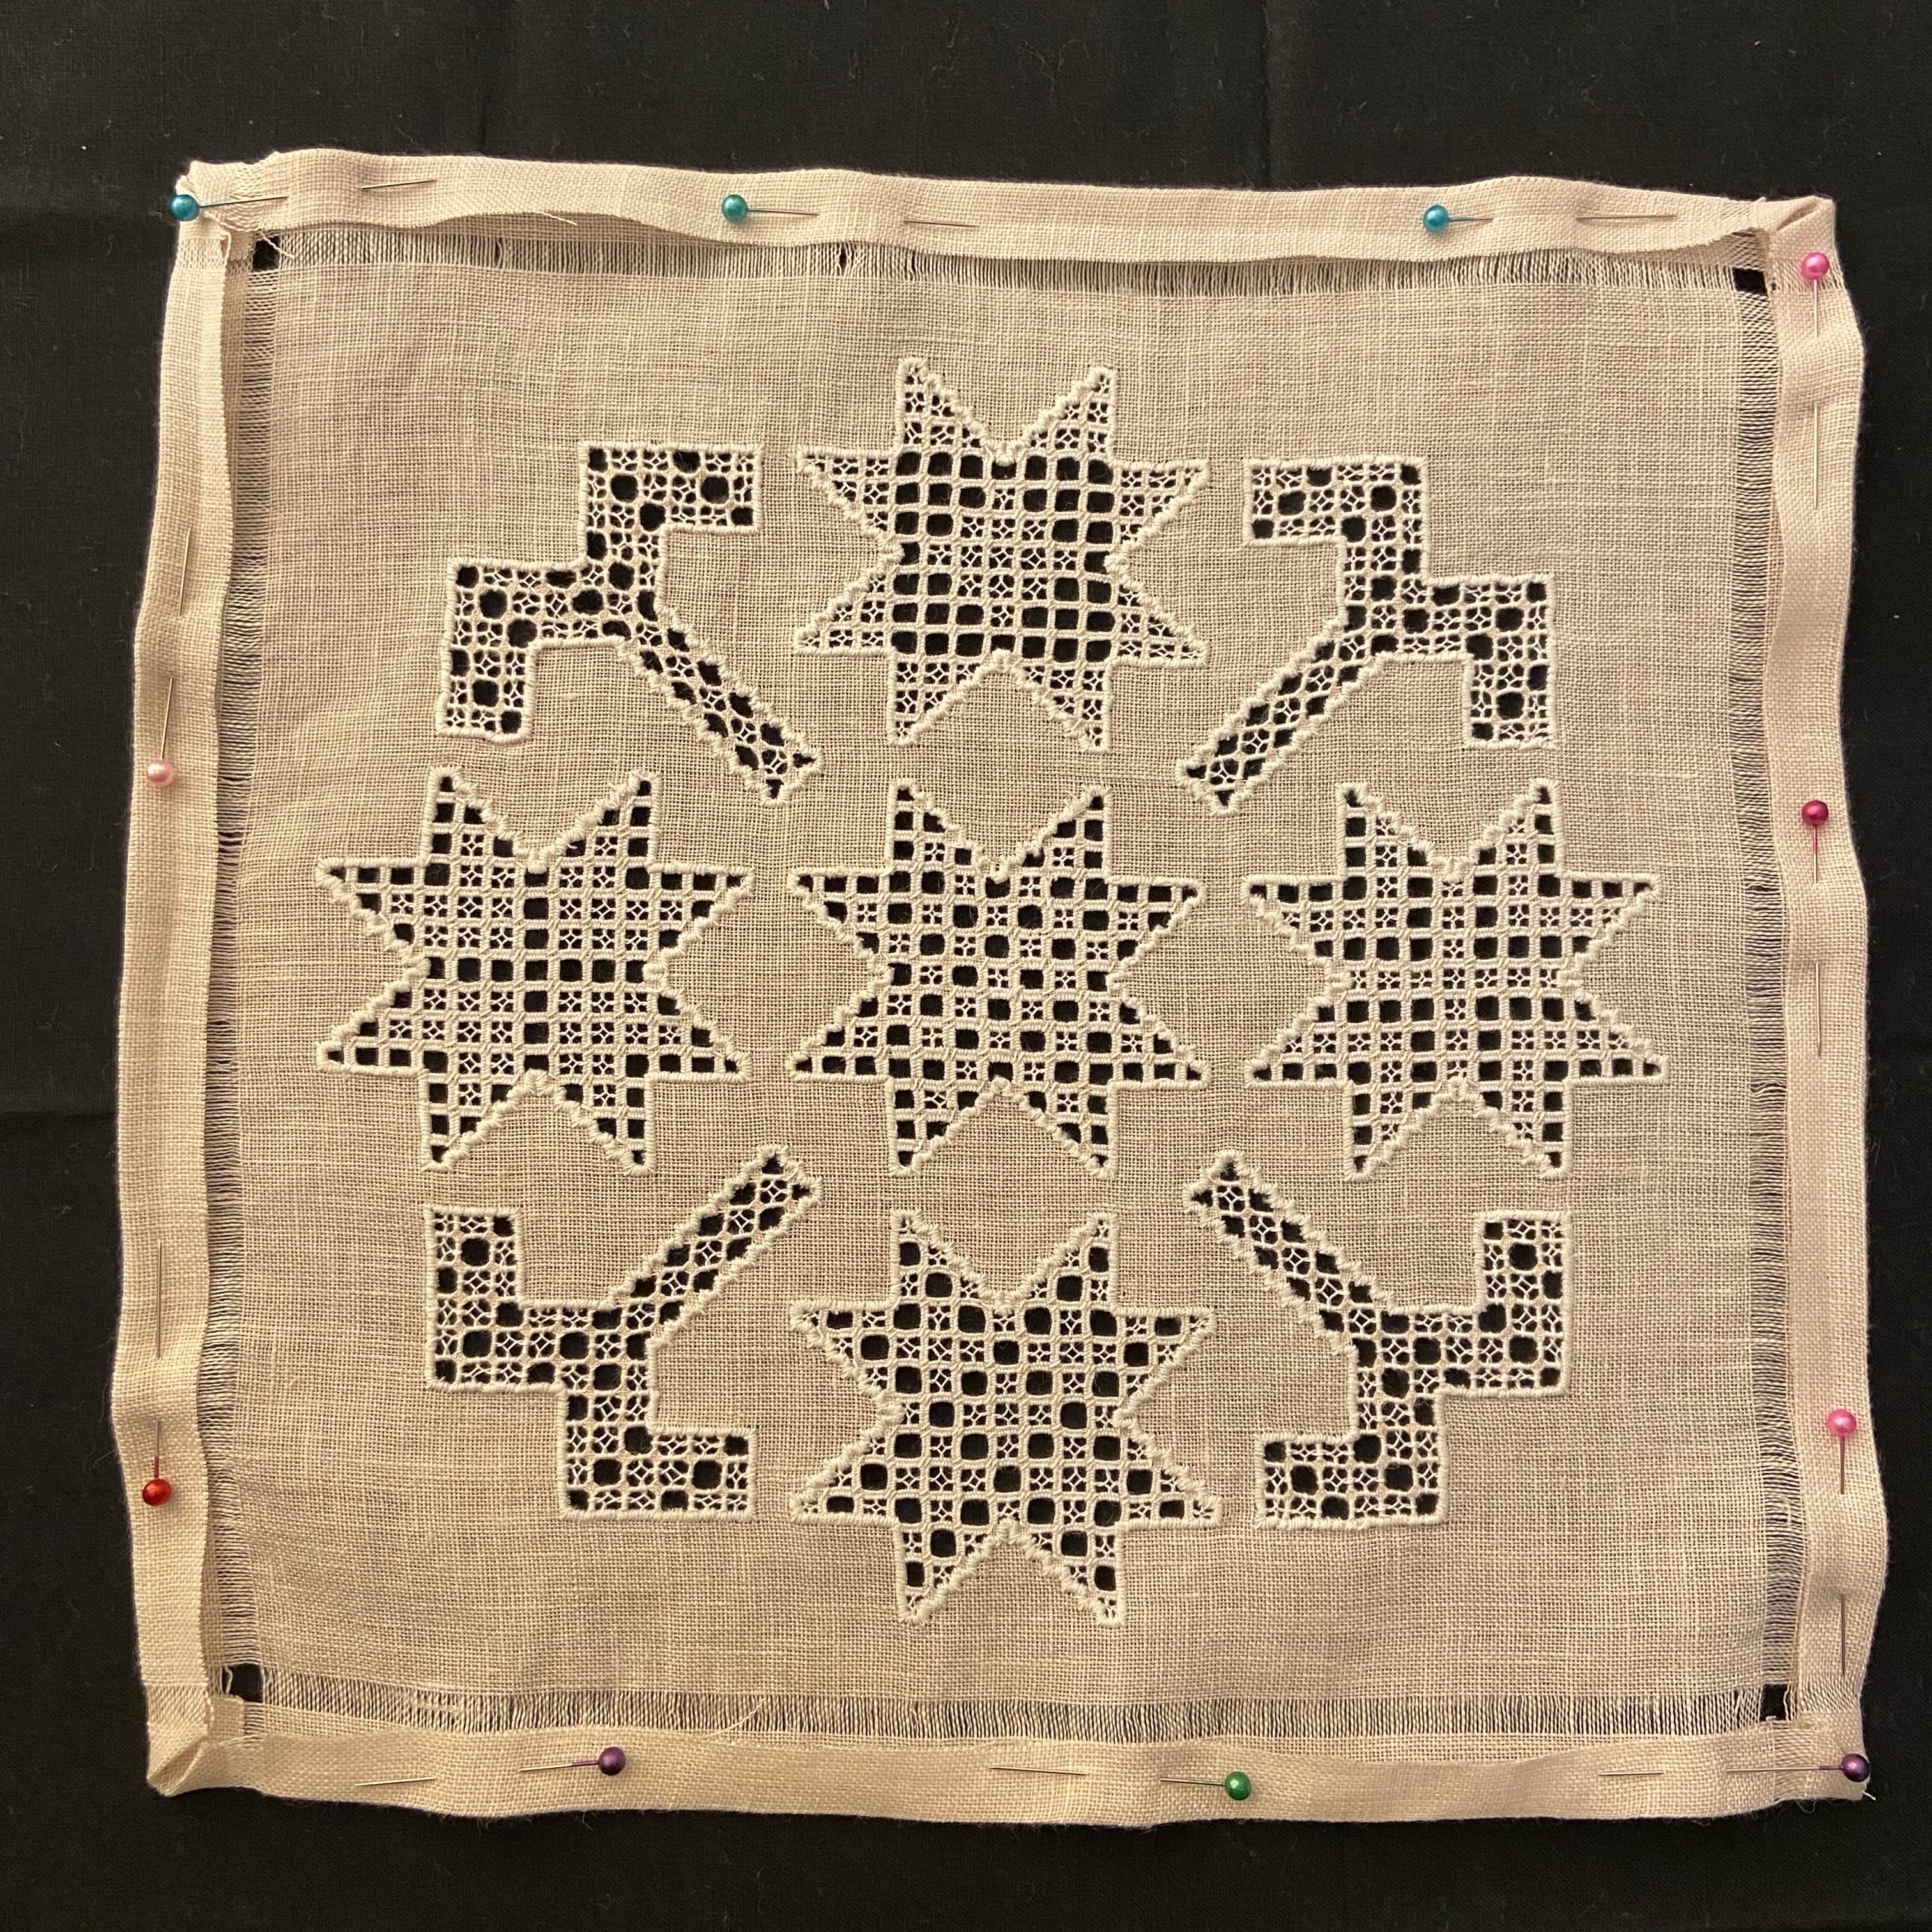
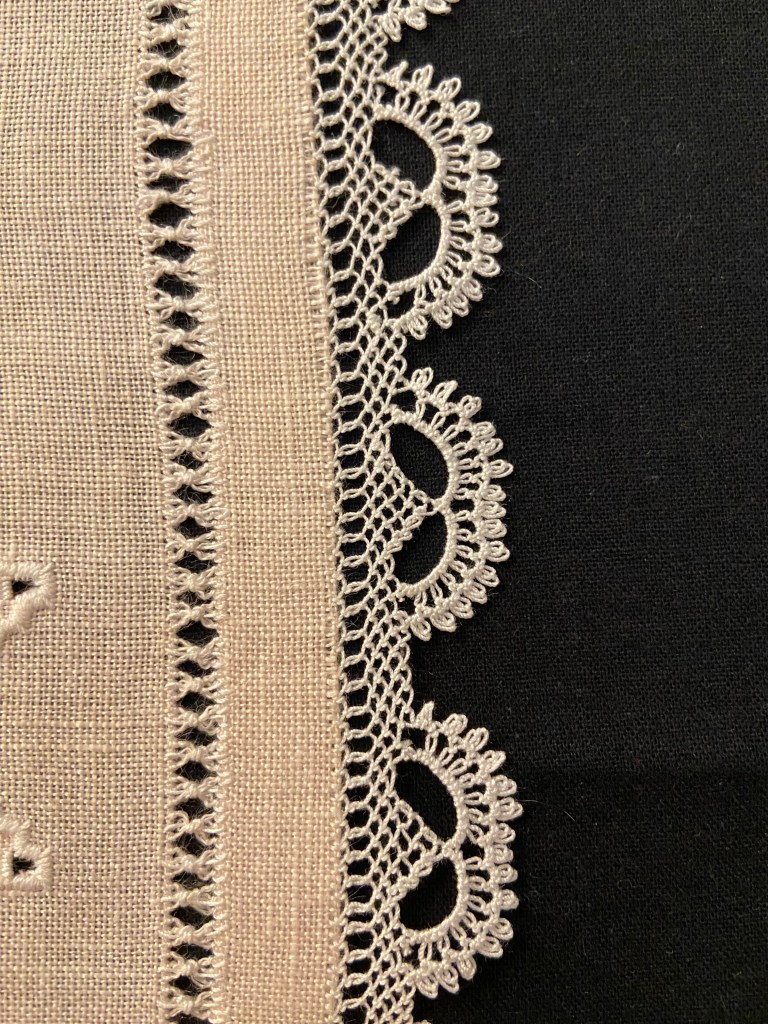
Hemstitching can be both functional and decorative. I used it in this piece to secure the raw edge of the linen to the back of my embroidery. First, I trimmed down the excess fabric and selectively withdrew threads to set up my hem and a decorative drawn thread band.
The hem is folded over a withdrawn thread. I pressed and pinned this before beginning the hemstitching. I tried to carefully align the raw edge with the drawn thread band, but this is harder than I expected it to be in practice. This was also my first time making mitered corners. It wasn’t hard per se, but I could definitely use more practice.
I hemstitched the functional side of the border first, putting stitches around groups of only two threads so the raw edge would be very secure. I repeated this process on the inner part of the drawn thread band.
Needlelace Edging
My original plan for the lace was to attach small flowers all along the hem. I’ve seen this on quite a few Aintab embroidery pieces and it’s beautiful. It’s also very tedious, so in the interest of time I switched to scallops.
I practiced making the scallops with my doily earlier this year, so I had a plan for executing the border. Part of the beauty of needlelace is it doesn’t have to be exactly mathematical – it is perfectly possible to fudge stitch counts and end up with something that still looks great. The foundation row stitch counts were off by more than 10 stitches between some of the sides, and I was able to distribute this unevenness around the piece.
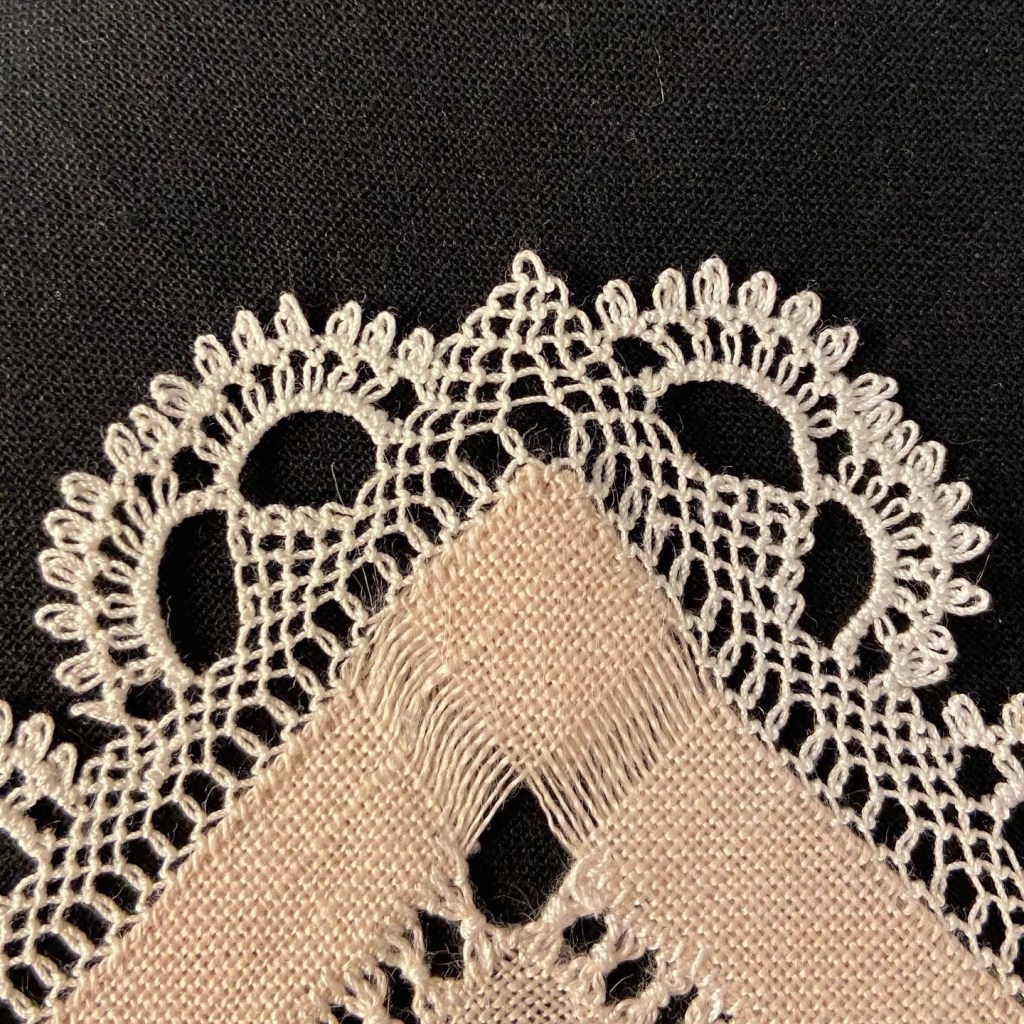
I’m very happy with the way the lace turned out. This was my first time making sharp corners and it was very fun. It inspired me to make needlelace polygons – I have several underway right now and I see many future uses for them.
I finished the lace while I was demoing with CRLG at the Maryland Sheep and Wool Festival. It was an excellent way to end the weekend.
Decorative Drawn Thread Border
The final step was adding some decorative elements to my drawn thread band. I had initially intended to do something very elaborate – or in Hrazdan Tokmajian’s words “extremely difficult, time-consuming, and unnecessarily complicated.” I like a challenge, but wanted to be realistic and chose this simple knotted design to avoid risking not being able to finish this piece in time for the state fair.
Conclusion
That’s it. This entire process has been a labor of love and I’m very excited to have finished the first of what I’m sure will be many Aintab embroidery pieces. In retrospect, my research into cutwork methods was helpful, but by far the best way to learn is to actually do the embroidery. Cutwork was very mystical to me for a long time and I was quite intimidated by it; I hope that I have demystified the process for those who are interested in picking it up themselves.

If you have read my writeup, thank you. The goal of all of this is to preserve and share Armenian embroidery and I deeply appreciate everyone who is interested.
Footnotes
- Kasparian, Alice Odian. Armenian Needlelace and Embroidery. EPM Publications, 1983.
- Tokmajian, Hrazdan. Ayntab Needlework, Part A. Grtasiradz Cultural Association of Aleppo and Pyunik Charitable Foundation, 2015.
- Armenian Embroidery, Echoes from the Past. Armenian Relief Cross of Lebanon, 1999.
- Vinton, John A. (1910). Missionaries of the A.B.C.F.M. Memorandum, 1885-1910. Vol. 4. p. 68
- մաքուր/makoor: clean or pure. Մաս մաքուր հայերէն is pure, unadulterated Armenian that has not been “tainted” with colloquialisms or loanwords, be they Turkish, Arabic, Farsi, or otherwise. In other words, prescriptivism under a different name. The concept of makoor is frequently applied to many aspects of Western Armenian culture.
- I’m a contractualist.
- Kasparian calls Aintab embroidery “two-alike-faced,” though it is not possible for Aintab embroidery (or any counted cutwork) to be exactly alike on both sides. I believe this misconception stems from art historians without experience in embroidery making observations which appear to be correct to their untrained eye. There are similar claims about Svaz embroidery.

