When I talk about lace with people who aren’t crafters, one of the most common comments I get is that it looks difficult and that I must be talented. I understand this is supposed to be a compliment, but I fundamentally disagree with the premise on both fronts. First, Armenian needlelace is quite forgiving as we’ll see in this post. Second, I firmly believe all crafts are skills that anyone can learn. I didn’t exit the womb doing needlework, but I do have thousands of hours of experience and have over time gained skill in the crafts I’ve dedicated my time to. I’m certainly not perfect and make mistakes regularly, but in my years of crafting I’ve learned that very few errors are unrecoverable.
I’ve found that the ability to fix mistakes is often what separates beginner crafters from the advanced. One day I’ll share my earliest attempts at Armenian needlelace (and will include my early crochet, embroidery, and knitting if I can find them) to illustrate this point, but today I want to discuss two recent projects where things went wrong and how I went about fixing them.
Armenian Needlelace Doily
I get a lot of needlelace inspiration from the pieces in the Priscilla Armenian Lace Book and Alice Odian Kasparian’s Armenian Needlelace and Embroidery. The scalloped border on the doily below from the latter appears fairly often, and I decided to try it out because I love the effect it gives. The pattern is simple enough, only requiring four rows.
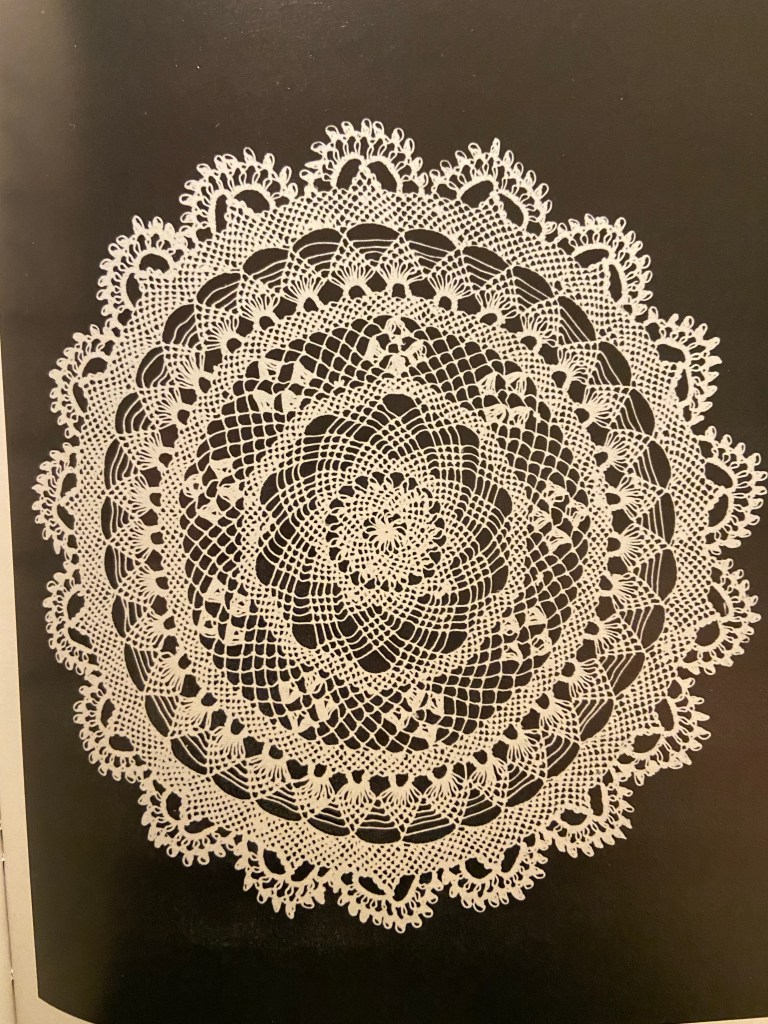
As you can see, the scallops didn’t pan out in my doily. I design most of my doilies on the fly, only planning out one band at a time and rarely sketching things out before I start stitching. My mental math failed here – I didn’t account for the outer radius of the scallops, leaving everything squished in a much too small space. Not only does this look strange, it also prevents the lace from laying perfectly flat.
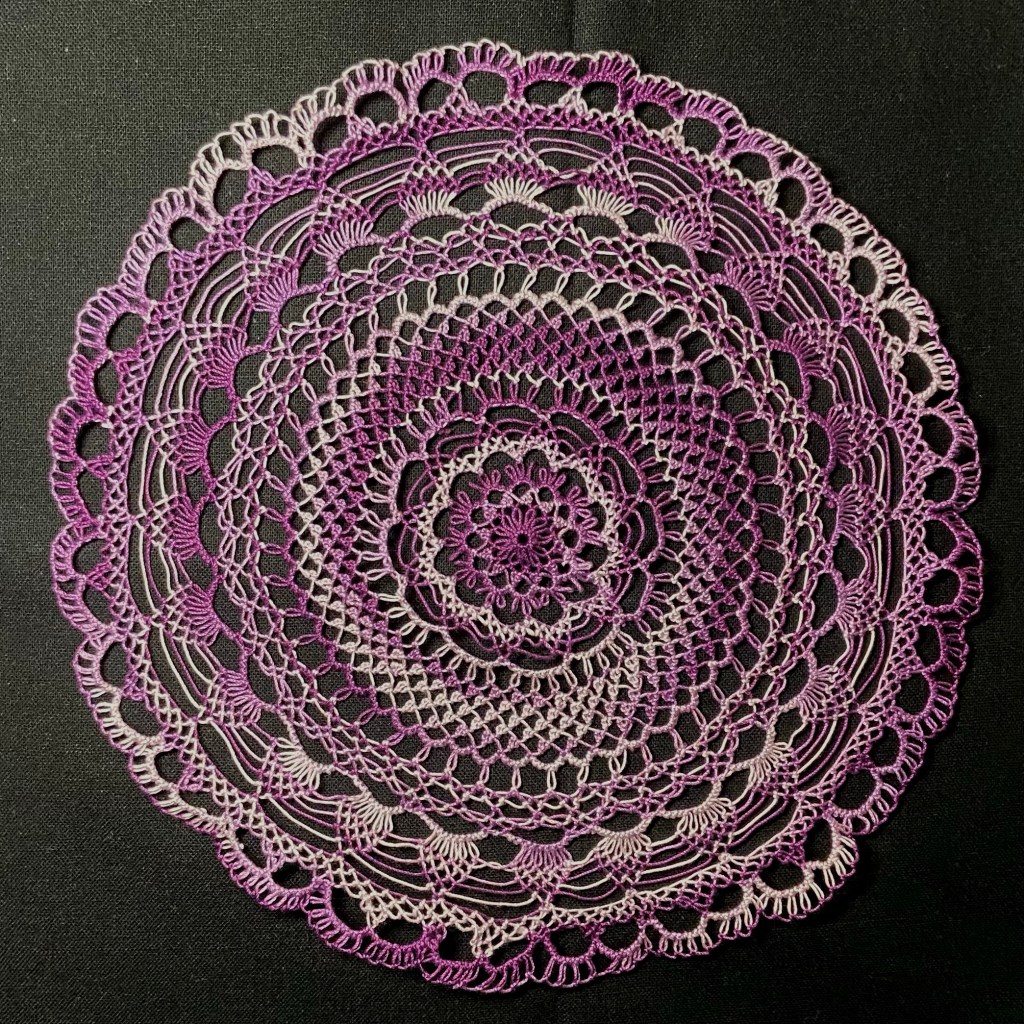
I very much did not like the way this looked after I finished it, but I never make design changes hastily. Instead I put it away and focused on other things, wanting to come back with fresh eyes. After two months, I brought it back out and still hated my lumpy scallops so I decided it was time for some doily surgery.
I have no problem undoing old work and fixing it. I once knit an entire sweater before deciding I didn’t like the way it fit. I took apart the entire thing then reknit it in a different size. Crafting takes a very long time, and I would rather take the extra time to create something I love than cut corners and end up with something I won’t use or wear. I wear the sweater many times each winter, and probably wouldn’t have worn it at all had I not gone back and knit it a second time.
With a pair of curved scissors, I very carefully cut the scallops off then unpicked the remaining knots with a sharp needle. The curve in the scissor blades helps to protect against snipping the wrong threads and generally make the process flow more smoothly.
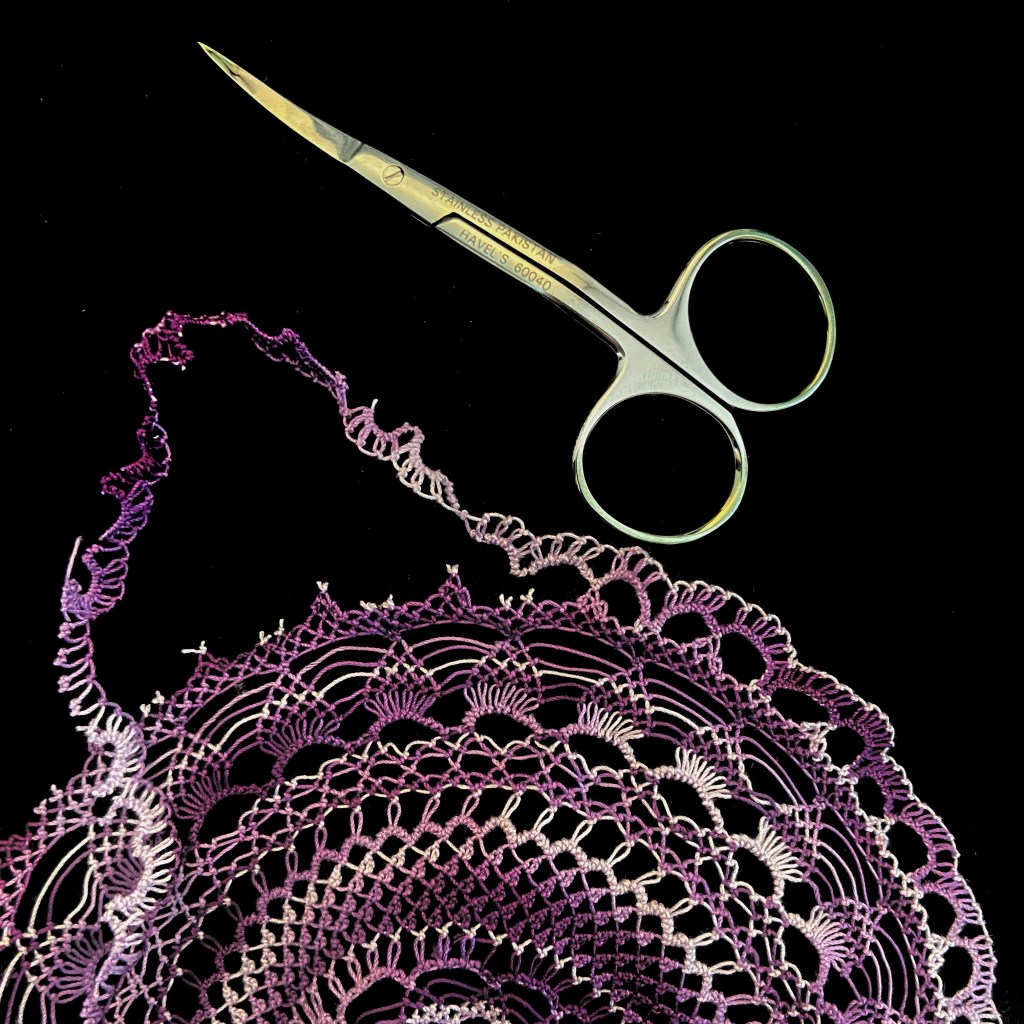
All told, I spent less than an hour on the doily surgery, and the result was most certainly worth it. I now love this piece and am planning on submitting it to the state fair this year.

Aintab Sampler
I mentioned my plans for an Aintab embroidery sampler, and almost everything about it has changed significantly since then. First, I realized I hadn’t accounted for the needlewoven bars when I charted the stars, and later realized the closely spaced cutwork was going to make the fabric very weak.
I got to work after redesigning my chart to account for the bars and remove the smaller cutwork elements. In cutwork, the advised stitching order tends to be to complete all surface/satin stitches, then cut the threads, and do the filling stitches at the end. Instead of doing this, I’m fully completing one star at a time. I use hoops instead of a frame, and moving a hoop around with unfilled cutwork feels risky.
The cutwork on this design is quite dense, even after I removed the smaller elements. The weft between each star less than half an inch long, and there’s a risk of pulling it out completely. I was being very careful to avoid this, but sometimes things go wrong. In this case, I was a little too confident and had started pulling out threads four at a time instead of individually. This increases the friction on the threads and in turn I started pulling harder than usual, so out came all four weft threads in this row.
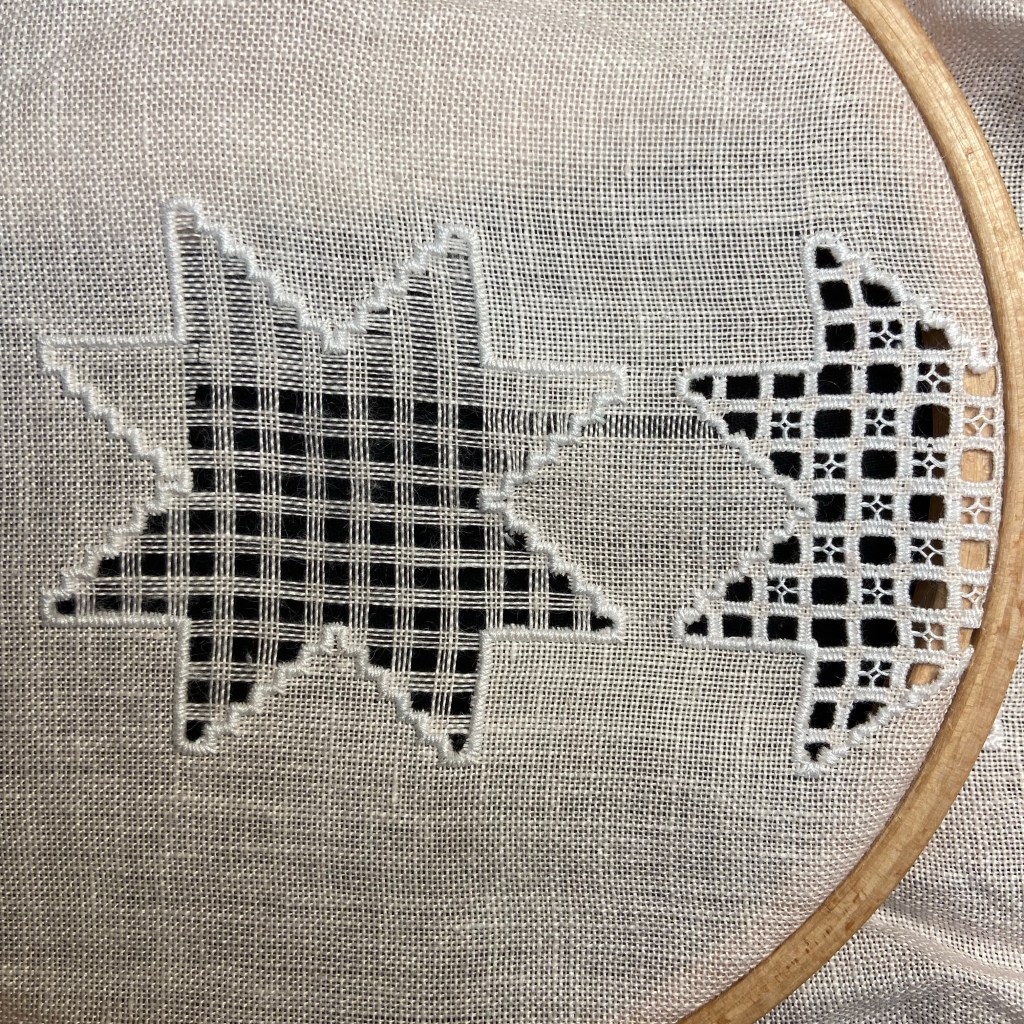
This looks disastrous, but is luckily very straightforward to fix as you can easily replace the weft threads with a needle. I pulled a thread out from the edge of my fabric and used it to almost invisibly repair the gap.
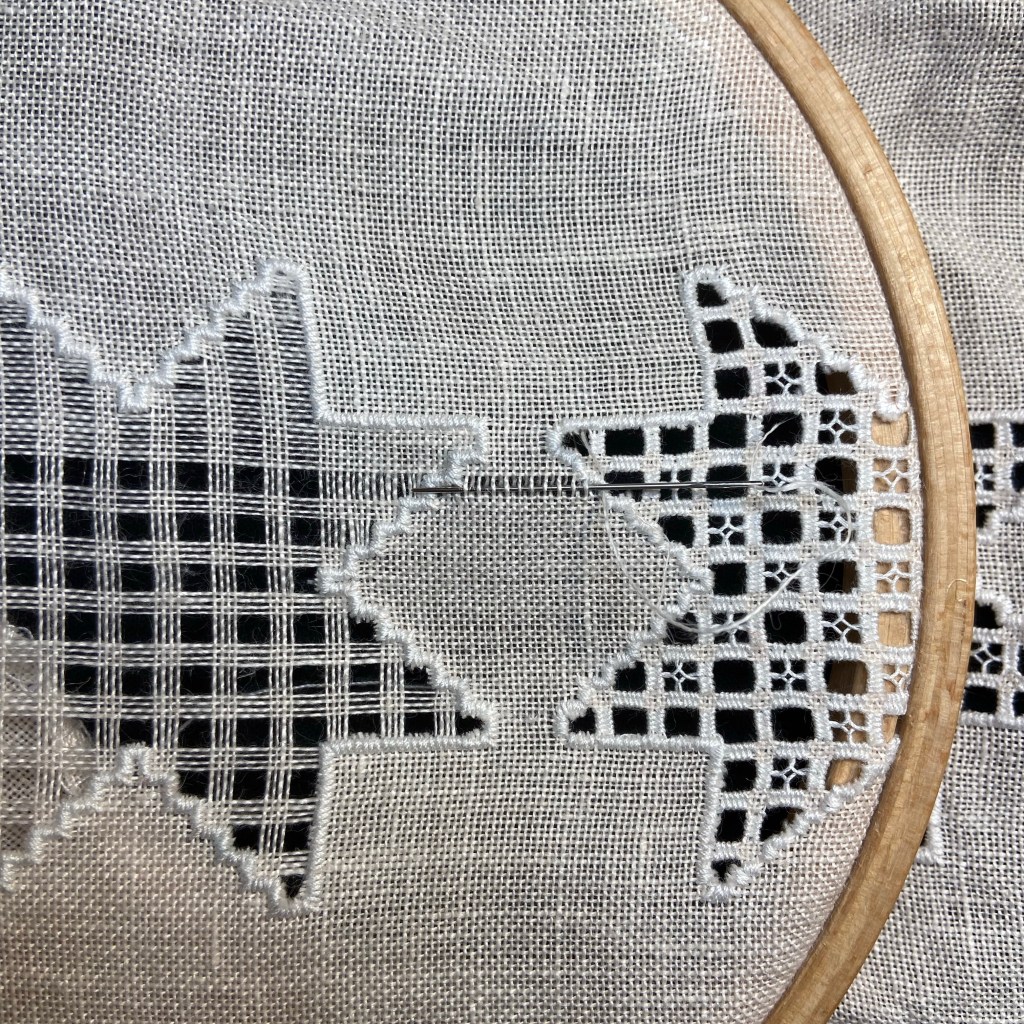
I secured each end of the repair thread under the satin stitch border of the stars. If you look closely you can see small gaps where I ran the threads under the embroidery.
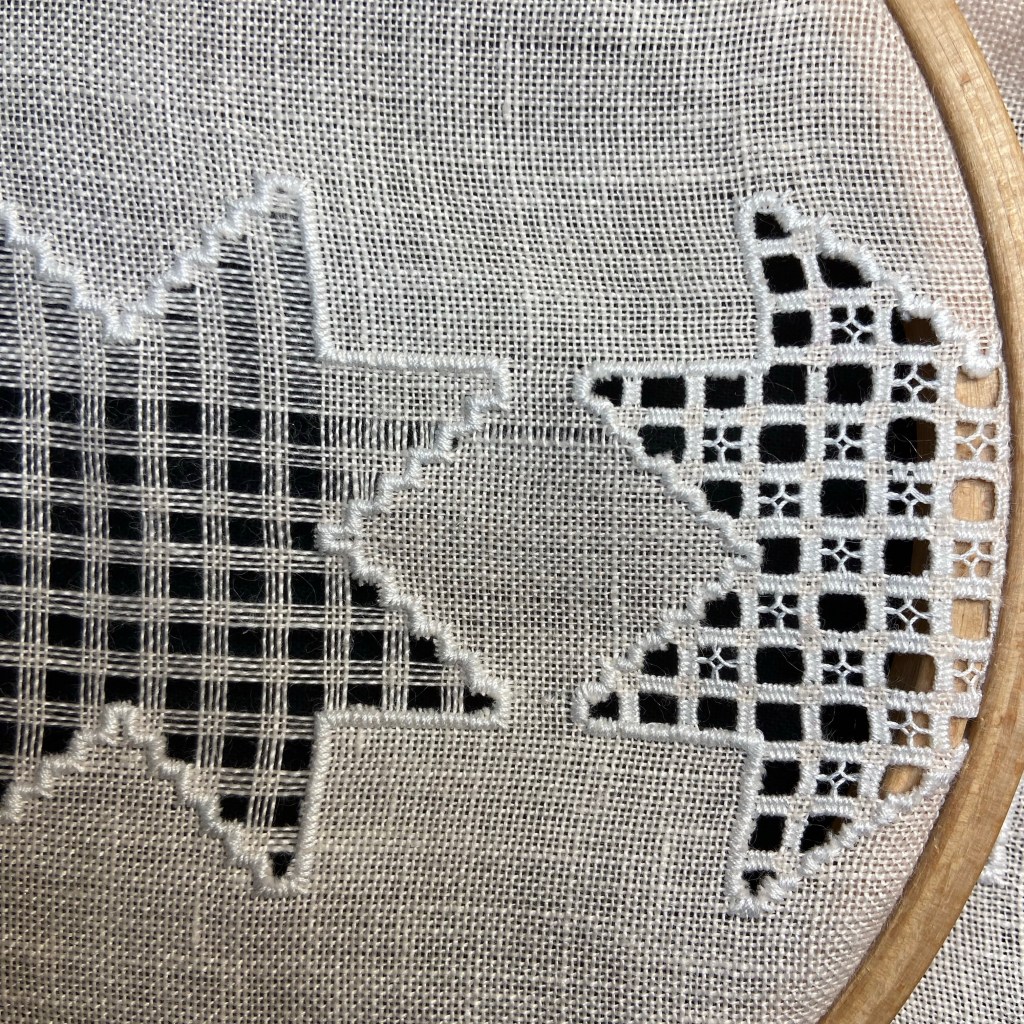
Half an hour later the weft was good as new. From far away, the repair is invisible. This was a very quick fix that allowed me to continue cutting and pulling threads (albeit a little more carefully) without fear of further damage. I’m now nearly done with the filling stitches on this star.

Final Thoughts
Things go wrong. It’s inevitable and presents an opportunity to learn new skills and build resilience each time it happens.
I have several other projects going right now (some of which are going wrong) that I plan to share in the near future. I’m still solidifying everything but I have some exciting plans lined up for 2024 and have been brainstorming ideas for a few huge projects.

